
Pure Tallow Soap: A Beginner’s Soap Recipe
If you’re curious about traditional soapmaking or want to make a simple, skin-loving bar, pure tallow soap is the perfect place to start. Using tallow (rendered beef fat) might sound old-fashioned, but it’s been a trusted soap ingredient for centuries—and for good reason. Tallow produces a creamy, long-lasting, gentle bar that’s perfect for your skin and beginner-friendly.
When I first started making soap, I was so excited… until I used my first bars. They became mushy and were used up way too quickly! That led me on a journey to research and perfect the ideal formula for a hard, long-lasting bar that doesn’t get slimy in the shower. I learned that each oil, fat or butter brings its own unique properties to soap once they undergo saponification.
My favorite fats to use for long-lasting, hard bars??? Tallow and lard—animal fats for the win!
My favorite recipes are tallow- and lard-based blends, and in From Seed to Soap, I share all 14 formulations I’ve carefully tested and perfected over time. Alongside the recipes, you’ll find clear charts and explanations showing how a variety of oils, fats, and butters each bring their own unique properties to a finished bar of soap.
Why Tallow Soap?
A 100% tallow soap is simple, satisfying, and perfect for beginners learning the cold process method without juggling too many ingredients.
Here’s everything you need to know to make your first batch of pure tallow soap.
Tallow is packed with fatty acids that give your soap a stable, creamy lather. Unlike many commercial bars, a pure tallow soap is simple, nourishing, and free from synthetic additives. It’s also a sustainable choice—when sourced from grass-fed or local farms, you’re supporting regenerative practices. While tallow may be trending right now (and for good reason!), it’s actually a time-honored ingredient that has been trusted in soapmaking for centuries.
Benefits of tallow soap:
Gentle and conditioning
Hard, long-lasting bars
Ideal for sensitive skin
Traditional soapmaking fat
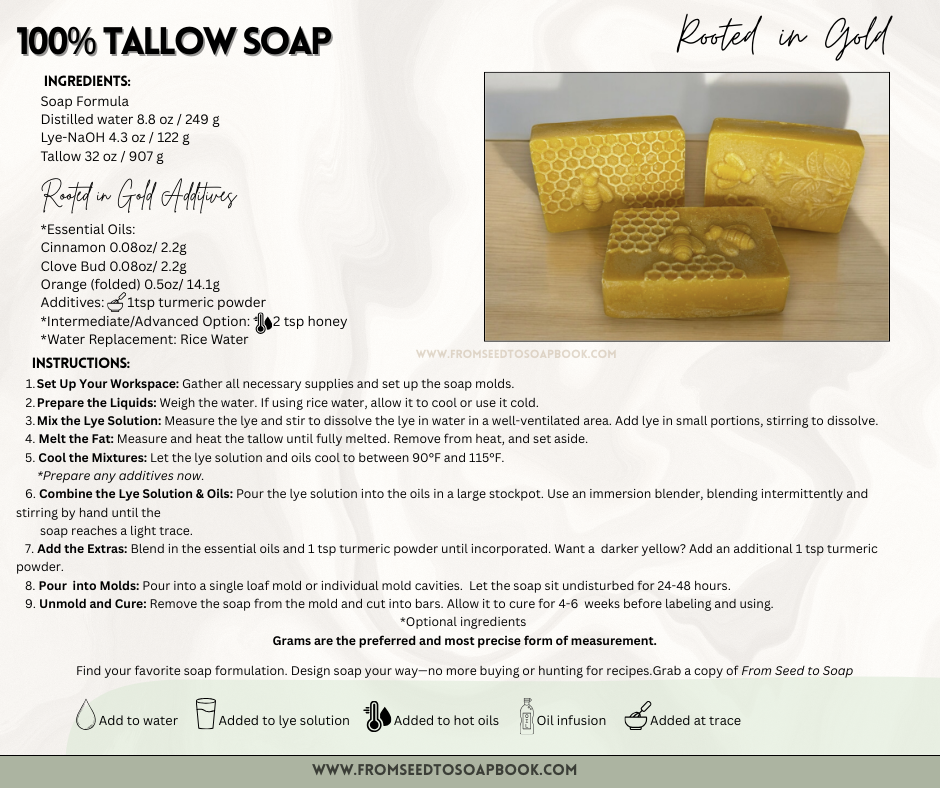
Ingredients
2 Pound Soap Formula
Distilled water 8.8 oz / 249 g
Lye-NaOH 4.3 oz / 122 g
Tallow 32 oz / 907 g
Optional Essential Oils:
Cinnamon Essential Oil 0.08oz/ 2.2g
Clove Bud Essential Oil 0.08oz/ 2.2g
Orange (folded) Essential Oil 0.5oz/ 14.1g
Additives:
1-2 tsp turmeric powder
Tip: Always use a digital scale for accuracy. Smaller units of measure - such as grams make measurements more accurate. Essential oils each have their own safe usage rate, you do not want to add them randomly or measure using ‘tablespoons’. If you see them measured this way in recipes this is a major red flag that you have not found a good resource.
Safety First
Making soap involves working with lye. If you’re new to making soap from scratch, it is imperative that you learn to make it safely. Soapmaking uses lye to turn oils into soap—once your soap is fully cured, there’s no lye left in the finished bar.
Lye is very alkaline, and the lye solution (or soap batter) can burn your skin (or eyes) if it splashes.
Protect yourself: Always wear gloves, goggles, and long sleeves. I like to wear an apron too. Regular glasses aren’t enough—goggles over them are best! A splash of lye will permanently etch your eyeglasses… so really - put the goggles over them and be a geek while you enjoy the science of making soap.
Ventilate your space: Work in a well-ventilated area. Open a window or turn on the oven fan.
Keep it controlled: Never leave lye or soap batter unattended. Keep kids and pets safely out of your workspace. Personally, I mix my lye in a lye-safe plastic pitcher in my kitchen sink and open the window. If a spill happens, it goes down the drain safely—and it even helps clean my pipes! Lye can discolor countertops, so protect your surfaces ahead of time. Soap batter can splash when mixing and pouring into molds. Grab some paper towels and prepare your area ahead of time.
Lye doesn’t have to be scary. Know the risks, take the safety precautions. With care, you’ll be perfectly safe. Check out my free lye safety download —or join me for a one-on-one virtual soapmaking session and let me mentor you through your first batch!
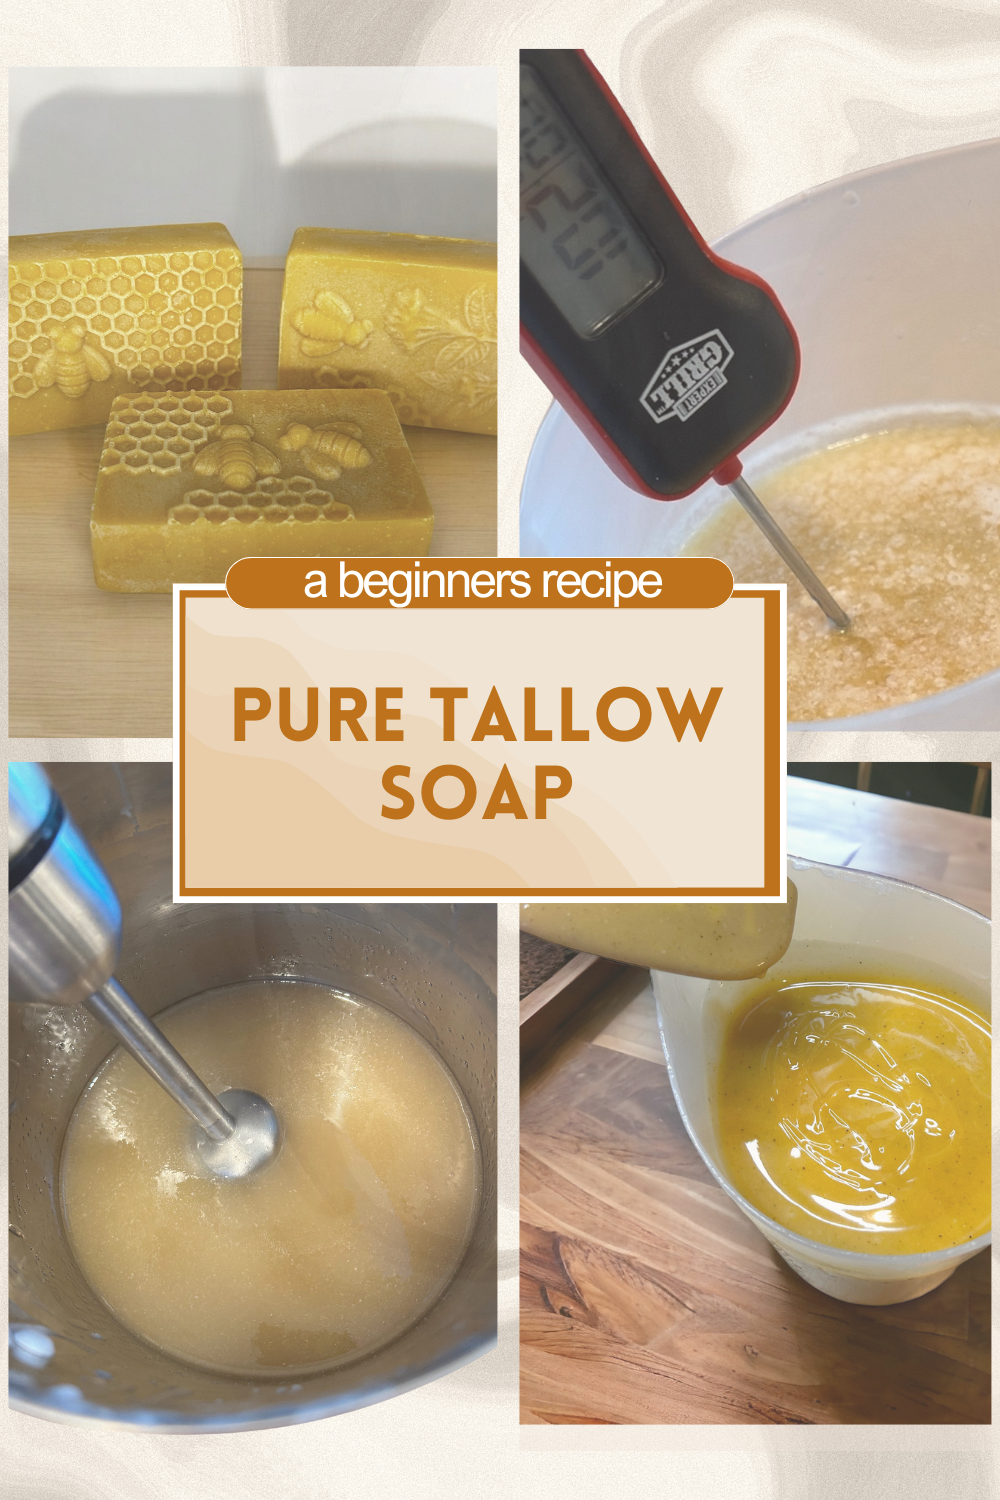
Step-by-Step Instructions
Set Up Your Workspace: Gather all necessary supplies and set up the soap molds. Check out my supply list here.
Prepare the Liquids: Weigh the water.
Mix the Lye Solution: Measure the lye and stir to dissolve the lye in water in a well-ventilated area. Add lye in small portions, stirring to dissolve.
*Make sure to use the proper safety attire and use safe handling guidelines.
Melt the Fat: Measure and heat the tallow until fully melted. Remove from heat, and set aside.
Cool the Mixtures: Let the lye solution and oils cool to between 90°F and 115°F. *While we wait on our lye and tallow to cool, we will prepare and weight our additives.
Combine the Lye Solution & Oils: Pour the lye solution into the oils in a large stockpot. Use an immersion blender, blending intermittently and stirring by hand until the soap reaches a light trace.
Add the Extras: Blend in the essential oils and 1 tsp turmeric powder until incorporated. Want a darker yellow? Add an additional 1 tsp turmeric powder.
Pour into Molds: Pour into a single loaf mold or individual mold cavities. Let the soap sit undisturbed for 24-48 hours.
Unmold and Cure: Remove the soap from the mold. If using a loaf mold, cut now. Allow soap to cure for 4-6 weeks before labeling and using. *You can always cut the end off your loaf and test it after a few days ( I know how hard it is to wait for soap to cure!)
Tips for Beginners
Start small: This two pound batch is perfect for your first few times making soap. The purpose in the beginning is to learn the process and learn to handle lye safely. Two pounds of soap will give you 9-10 bars, each weighing around 3.5-4 oz. Properly cured soap -waiting the full 4-6 weeks will give you the best bubble, the best feel and the longest lasting result.
Keep it simple: Focus on one oil or fat recipes first. That’s what makes this recipe a great place to start! Most of us have turmeric in our pantry, if you don’t, you can leave it out or use powdered cocoa for a brown bar.
Take notes: Track your measurements, temperatures, and observations for future success. Grab record keeping forms in the store.
If you can’t take an in-person soapmaking class, try a virtual one. If that’s not possible either, watch several soapmaking videos online—look at different soapmakers and their techniques. Pay close attention to how they handle lye safely and how they work with trace. After watching a few different makers, you’ll start to notice practices you want to adopt… and probably a few you’ll want to avoid.
Making a pure 100% tallow soap bar is one of the simplest ways to get started with natural soapmaking. You are using a traditional and holistic fat that is eco-friendly. Using a single fat allows you to learn the fundamentals—working with lye, learning the process of soapmaking, achieving trace, and curing—without the distractions of fancy colorants or complicated recipes.
Once you’ve mastered this, you’ll have the confidence to experiment with essential oils, herbs, and natural colorants—creating soap that you love as you care for your family.
Want more step-by-step beginner recipes and tips? Grab my book, From Seed to Soap, where I walk you through tallow and lard-based soaps, natural colorants, and everything you need to make your own nourishing bars at home.
Want to buy the book on Amazon? Grab it here.
Disclosure: Some of the links on this site are Amazon affiliate links. This means I may earn a small commission if you make a purchase at no extra cost to you.