
A Natural Color Mindset
Choosing natural soapmaking does come with a small challenge—getting beautifully colored soap. But using plant-based colorants is part of that commitment, for our skin, our health, and the environment. Unlike synthetic micas or lab-made dyes, natural colorants are gentle, safe, and celebrate the simple beauty of nature.

I’ve been fascinated by plants and the outdoors since childhood, from staining my hands with poke berries to foraging wild ingredients as an adult. The world really does supply us with a full rainbow of natural color.
It’s important to set expectations when using natural colorants in soap. The colors are softer, earthier, more muted—think pastels instead of neon. Creating multi-colored soaps is possible, but it takes a little patience and planning. You can split your batter and mix in different botanicals at trace, use an oil infusion or water replacement for full-batch color, or add something like clay to part of the batter for contrast.
Remember, natural soap colors shift as the bars cure—that’s part of the fun. Keep notes on your infusions and measurements, and you’ll gradually build a palette of earthy, organic hues—a little rainbow unique to every batch.
Keep track of your recipes, color experiments, and notes so each batch gets better than the last. Perfect for natural soapmakers who love staying organized.
The process of saponification can alter natural colorants! Beet juice or powder would make you think you will get a beautiful deep red soap… WRONG! The chemical reaction during saponification will turn the beautiful deep red color of beets to brown in your finished soap- you will watch the color change before your eyes as you are blending your soap batter!
The “How-To” for Beautiful Natural Soap Colors
When you’re going for a natural hue in your soap, a few simple additives can help you get beautiful, earthy results.
Clays
Clays are one of the easiest and most reliable ways to color natural soap. French green clay, for example, is gentle, stable, and works consistently well. Just be careful—some clays marketed as “natural” may actually contain mica, especially if the color looks too bright. Always source from trusted suppliers, since not every clay will behave the same in soap. I generally add 1-2 teaspoons of clay per pound of soap.
To avoid clumps and get smooth mixing, make a slurry: blend 1 teaspoon of clay with 1 teaspoon of water, then mix in your essential oils and let it sit covered as you make your soap batter. This helps anchor the scent in the clay so that the scent as more ‘staying power’ in your finished bar of soap. *Take the 1-2 teaspoons of water from your recipe amount before adding lye, this way you aren’t adding additional water to your soap batter.
Once your soap batter is blended to light trace, you will add your essential oil, water and clay slurry. Continue mixing to desired trace and pour in your soap mold.
Adding Powders or Inclusions at “Trace”
Some botanicals and powders can be added at trace, once your soap batter has reached emulsion. For example, to make an all-black soap, you can add about 1 teaspoon of activated charcoal per pound of soap at trace, blend, and pour it straight into your mold.
This method is especially useful for creating multi-color soaps. Say you’re using Himalayan rhubarb-infused oil for a soft pink soap—once the batter reaches light trace, pour off 1/3 or 1/2 into a separate container, then add ½–1 teaspoon of activated charcoal to the portion you want black. Now you have two containers of soap batter—pink and black! You can pour them into your mold to create beautiful layers or swirls.
Other additives can be added at trace as well, such as ground oats, sea salt or poppy seeds - though they are added for exfoliation and visual interest rather than for color.
Oil Infusions
For botanicals that need to be infused, hot oil infusions are a faster alternative to cold infusions—taking about 24 hours instead of weeks. Let the solids settle before pouring off the oil, and strain with cheesecloth if you don’t want ‘speckles’. You can use 5–25% of the oil weight in your recipe for color, whether for the whole batch or just part of it (for two color soaps).
Why an oil infusion instead of just adding the powder at trace or to my hot oils while making soap? I’ve found that Himalayan rhubarb-infused oil gives a smoother, more even color than adding the powder directly to the soap batter at trace. If adding the powder to hot oils or to the batter at trace, you will also get a speckled look- which you may or may not prefer.
Color Blending
Mixing plant-based colorants can create custom shades. For instance, annatto-infused oil (yellow) combined with indigo powder (blue) makes green. Keep in mind that natural colors vary depending on your soap base—whether it starts off white or slightly yellow. All the recipes in From Seed to Soap start with a light, white soap batter, making it easier to predict and achieve beautiful natural colors.
Water Replacements
Some water replacements, like pumpkin purée, dramatically change your soap’s color—creating a fully orange batter. If you want a two-color soap, like orange and white, you’ll need two batches: one with the purée and one with a neutral water replacement (distilled water or milk). This same approach applies when using oil infusions for color. In From Seed to Soap, I go into more detail on planning multi-colored soaps using natural colorants.
Achieve varying shades: you can use a partial water replacement (25% pumpkin puree + 75% water) or a full water replacement (100% pumpkin puree) - the amount used will alter the shade of color achieved.
Using certain water replacements like pumpkin puree or juice add sugar to the formula which will increase the bubbles in your final soap as well.
It’s important to remember that herbs like oats or aloe are added to soap for exfoliation, bubbles, or visual interest—not for medical purposes. Because of the changes that happen during saponification, and the regulations around soap, cosmetics, and drugs, we can’t claim medicinal benefits—no matter how much we love our favorite additives and herbs.
The point of using natural ingredients in soap making is simple: to avoid synthetic ingredients, celebrate nature, and make use of the herbs we might already be brewing for leave-on products—all while reducing waste and being more eco-friendly.
Why It’s Worth the Effort
Using natural colorants takes a little more work than synthetic options, but the results are worth it. Natural additives help us avoid lab created ingredients or ingredients with ethical concerns such as those concerning mica mining.
Coloring soap naturally can be as simple as using turmeric you already have on hand- or as complicated as creating oil infusions and planning multi-colored bars. You get to decide.
Not every colorant is long-lasting, so I’ve included only the ones I’ve personally tested. For consistent results, stick with these or research and test to find your own stable, vibrant natural colors.
Working with natural ingredients is a small effort for a big reward: soap that’s safe, simple, and beautifully unique.
Want to save time experimenting and get step-by-step guidance for a rainbow of organic soap colors?
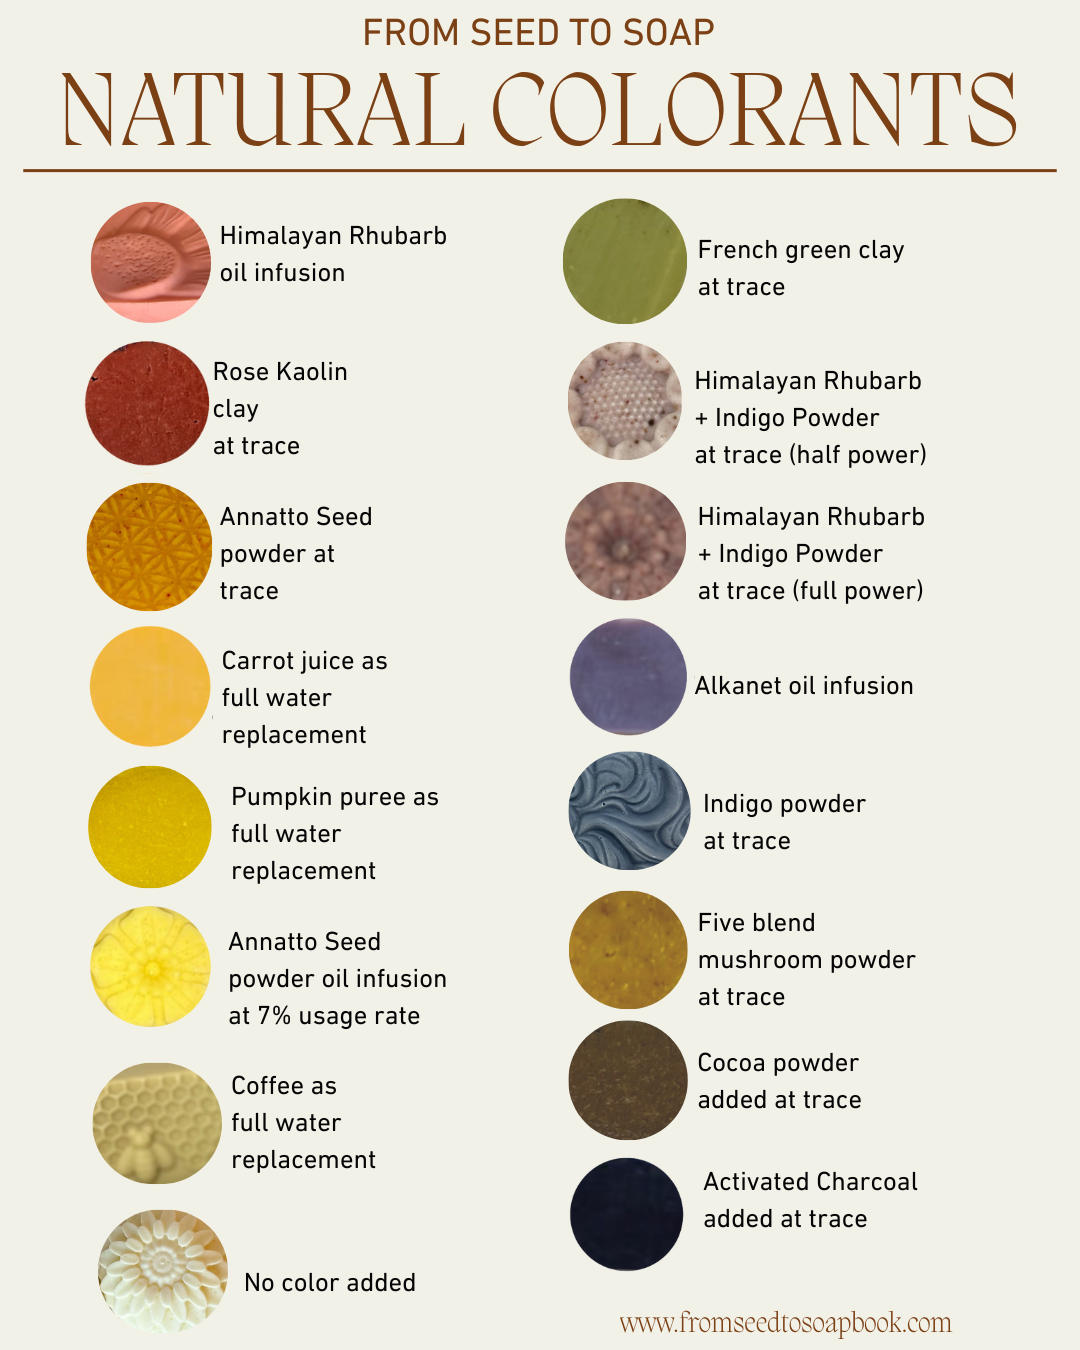
The world of natural colorants in soapmaking is vast! If you want more details and step-by-step guidance, grab a copy of From Seed to Soap. Inside, you’ll find charts for over 25 natural colorants, showing each ingredient, the exact amounts to use, and how to incorporate them—so you can create beautiful, vibrant soaps with confidence.
Want a free beginners soapmaking kit? It includes the soap batch recording that includes documenting your natural colorant journey, free recipes and lye safety information. Just join the newsletter and it will be sent to your email!