
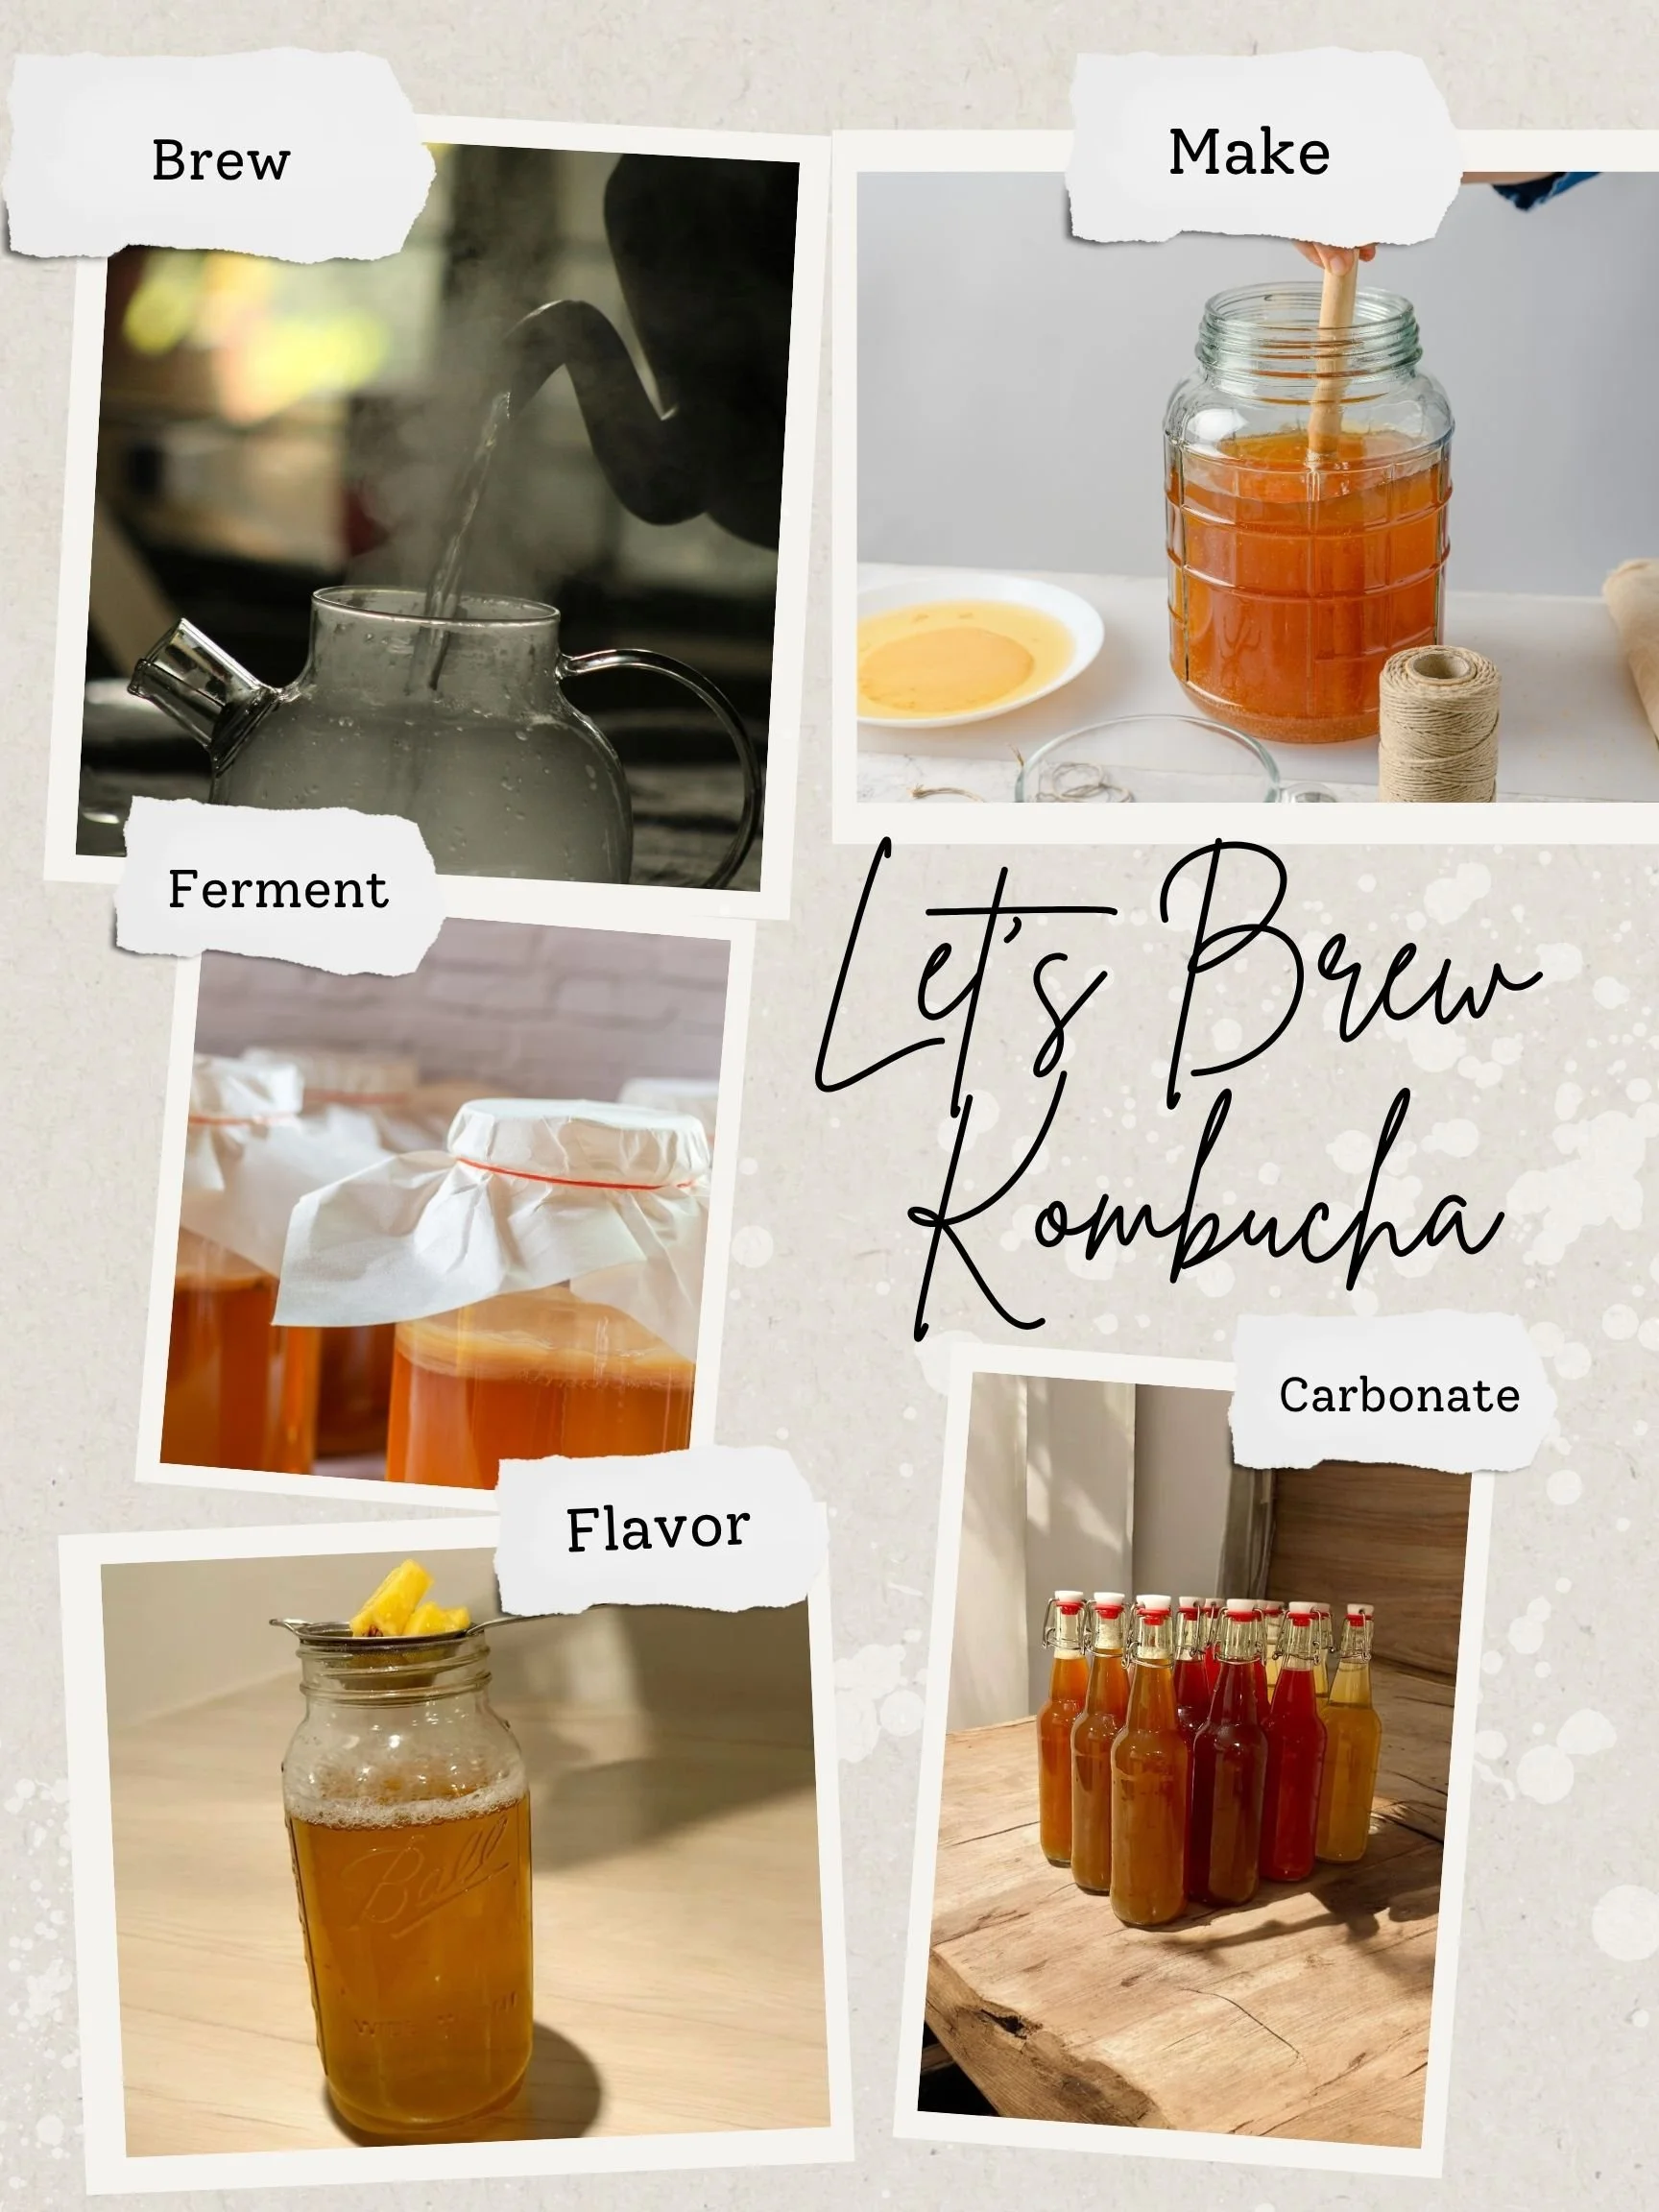
Let’s Brew Kombucha
To be honest, I did not like the taste of kombucha and could not fathom why my husband kept buying it for $4 a bottle. So… I learned to brew kombucha for my husband so we could save money and he could drink as much as he wanted.
Once I made it myself, I discovered that homemade kombucha tastes so much better than anything you can buy in the store! I may actually drink more than him now.
If you’ve ever wondered, “Could I make this myself?” the answer is yes. In my opinion it’s easier than sourdough.
What is Kombucha, Exactly?
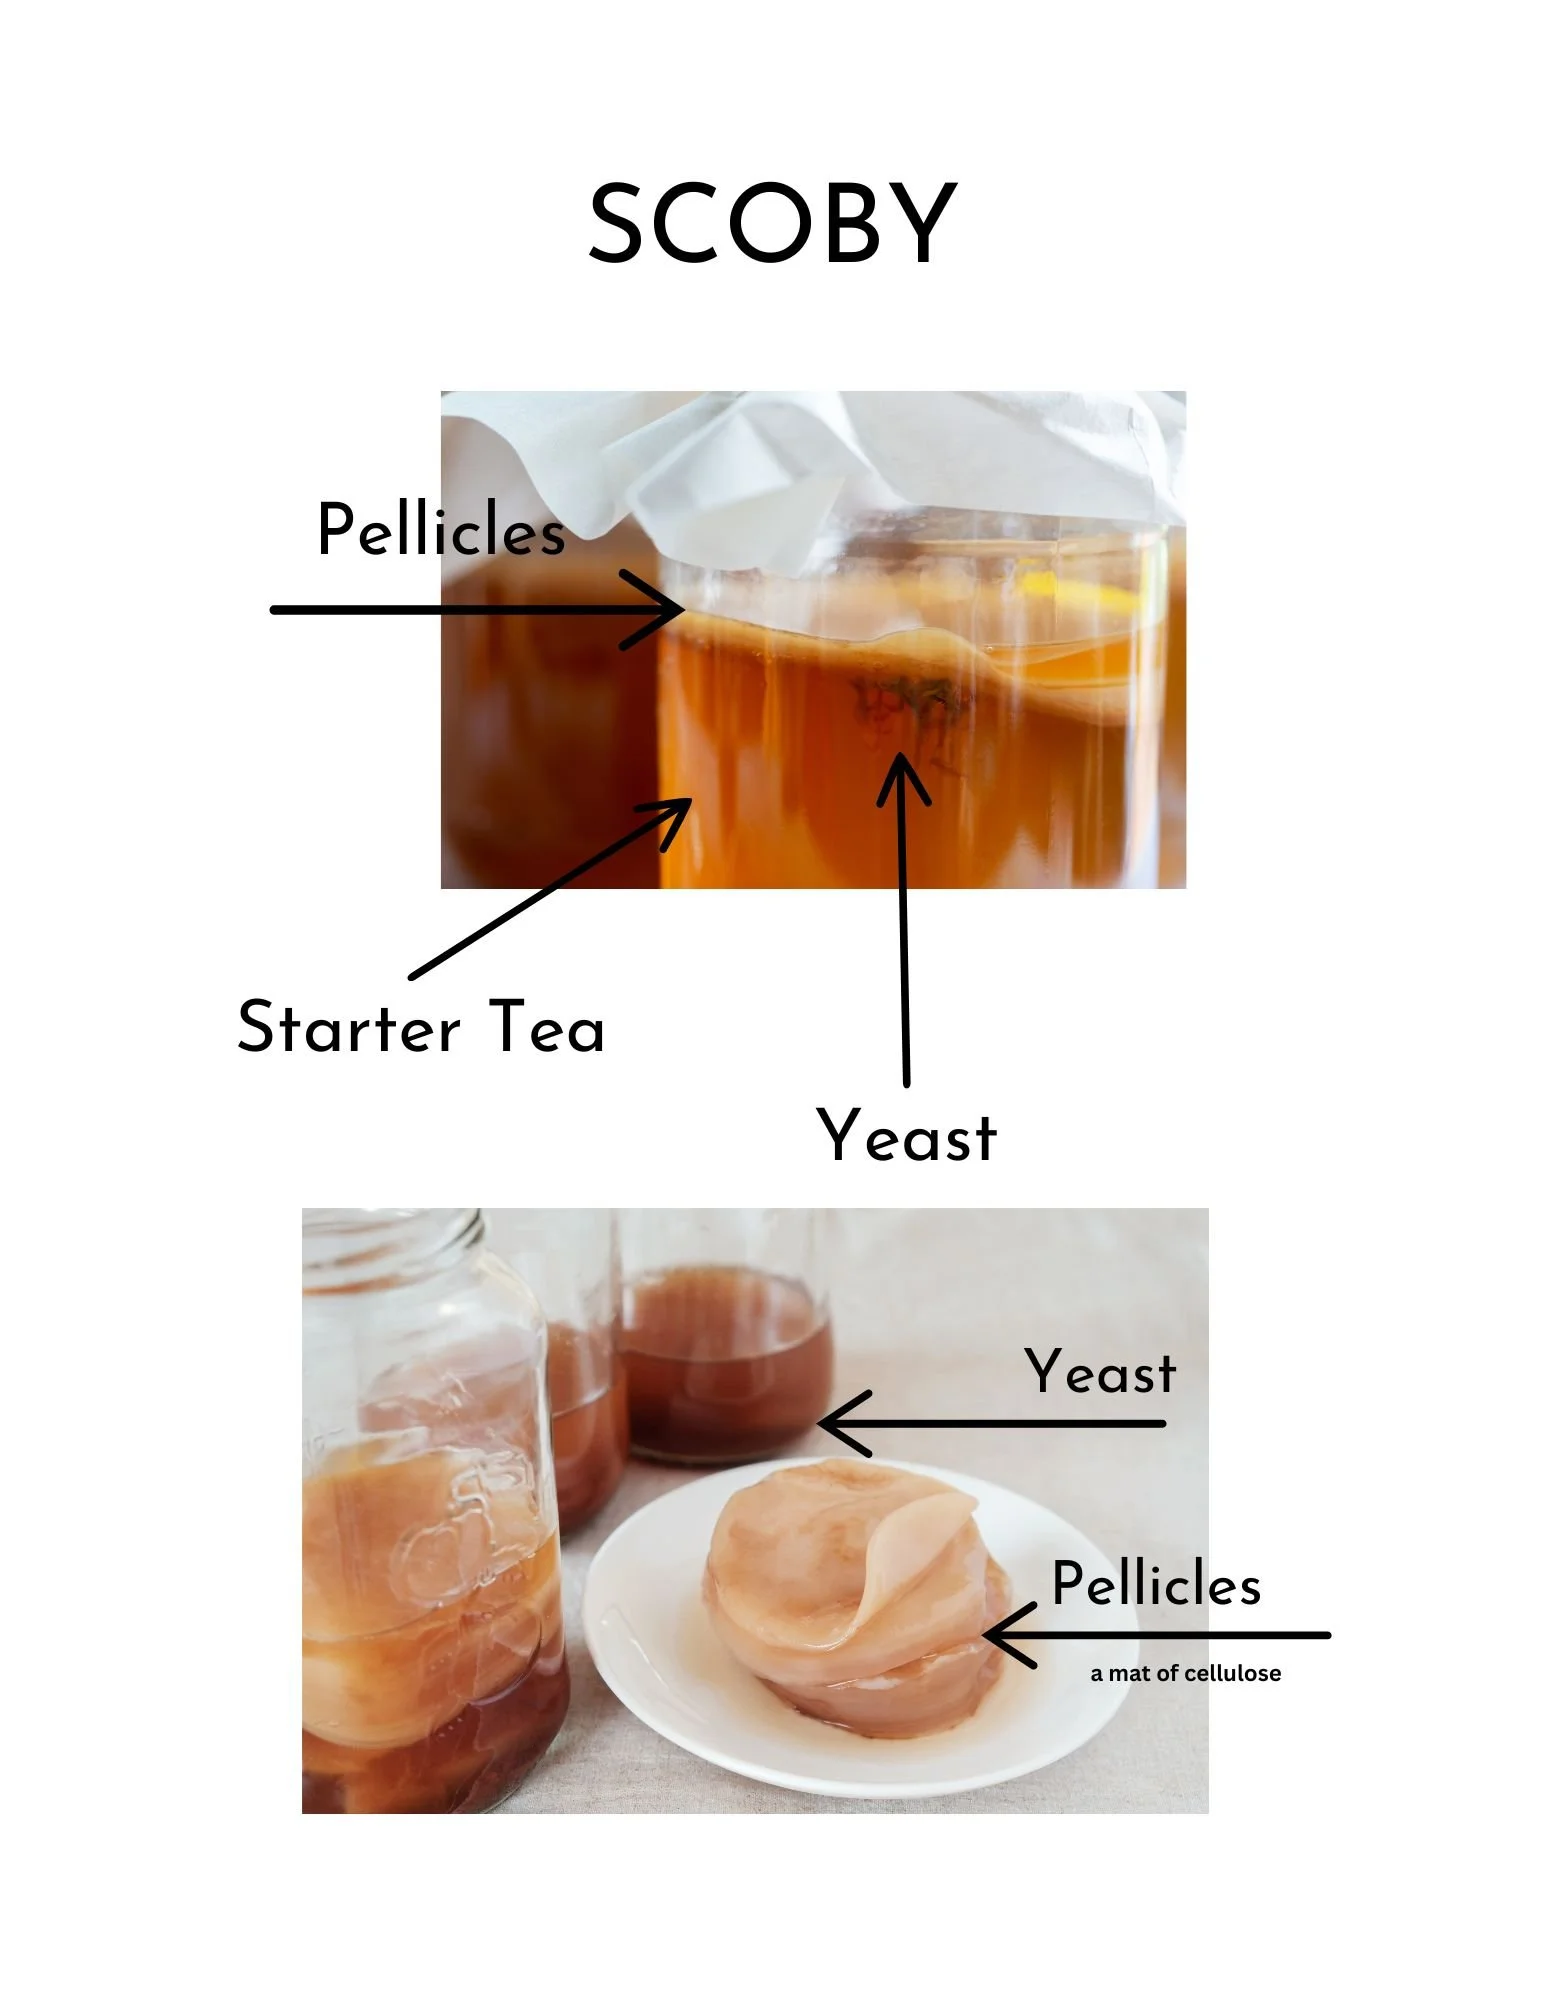
Kombucha has become a trendy beverage—but it’s been around for a long time. At its core, it is a traditional fermented drink made by combining sweetened tea with a SCOBY (a symbiotic culture of bacteria and yeasts). The relationship between the yeast and the bacteria is what makes kombucha a "symbiotic" culture.
Through the fermentation process, a fascinating transformation happens:
The Yeast consumes the sugar, producing ethanol and other metabolites.
The Bacteria converts those into beneficial acids (like acetic and glucuronic acid) and contributes to the probiotic content.
The Drink: You're left with a slightly sweet and sour flavor, full of probiotics with about the same amount of alcohol as a ripe banana.
Because the SCOBY consists of bacteria and yeasts that vary by region and fermentation conditions, every homebrew can have its own unique, distinct properties.
Why It’s Worth the Brew
Kombucha is popular worldwide for more than just its taste; it is packed with bioactive compounds such as organic acids, vitamins, enzymes, and antioxidants. Research and recent studies have explored several potential health-promoting effects:
Blood Sugar Regulation: A 2023 randomized controlled trialfound that kombucha consumption lowered the blood sugar response to high glycemic index meals in healthy adults.
Gut Health: Kombucha is rich in probiotics, which can enhance gut microbiome diversity and support digestion. Read about it here.
Cholesterol Management: Some studies indicate that kombucha may increase "good" HDL cholesterol and decrease "bad" LDL cholesterol, contributing to improved heart health.
Antioxidant Properties: Research has shown that kombucha possesses antioxidant activities, which can help combat oxidative stress in the body.
Why do I take the time to brew it?
We are super particular about eating and drinking real food. We don’t buy soda or other highly processed foods or drinks. Having kombucha and coconut water on hand is one way we keep our kids and guests happy instead of having our only beverage option being water.
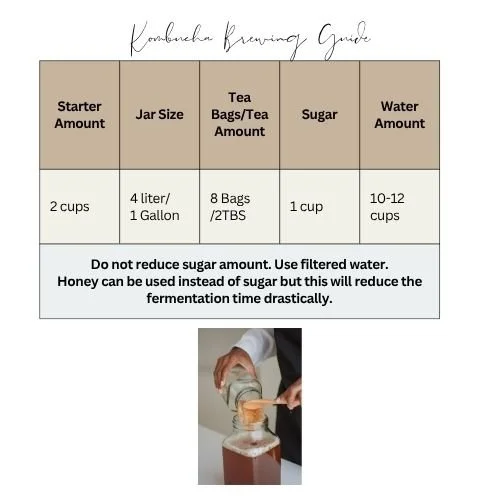
Tea Selection: I recommend using blackor green tea. I brew batches of both continuously.
Don’t like tea bags? Loose leaf black teaor loose leaf green tea. If using loose leaf, I love using these stainless tea bags to steep because they do not break apart!
What to Avoid: Stay away from teas with added flavors, oils, or spices (like Earl Grey or mint) for your primary ferment. Save those for flavoring later!
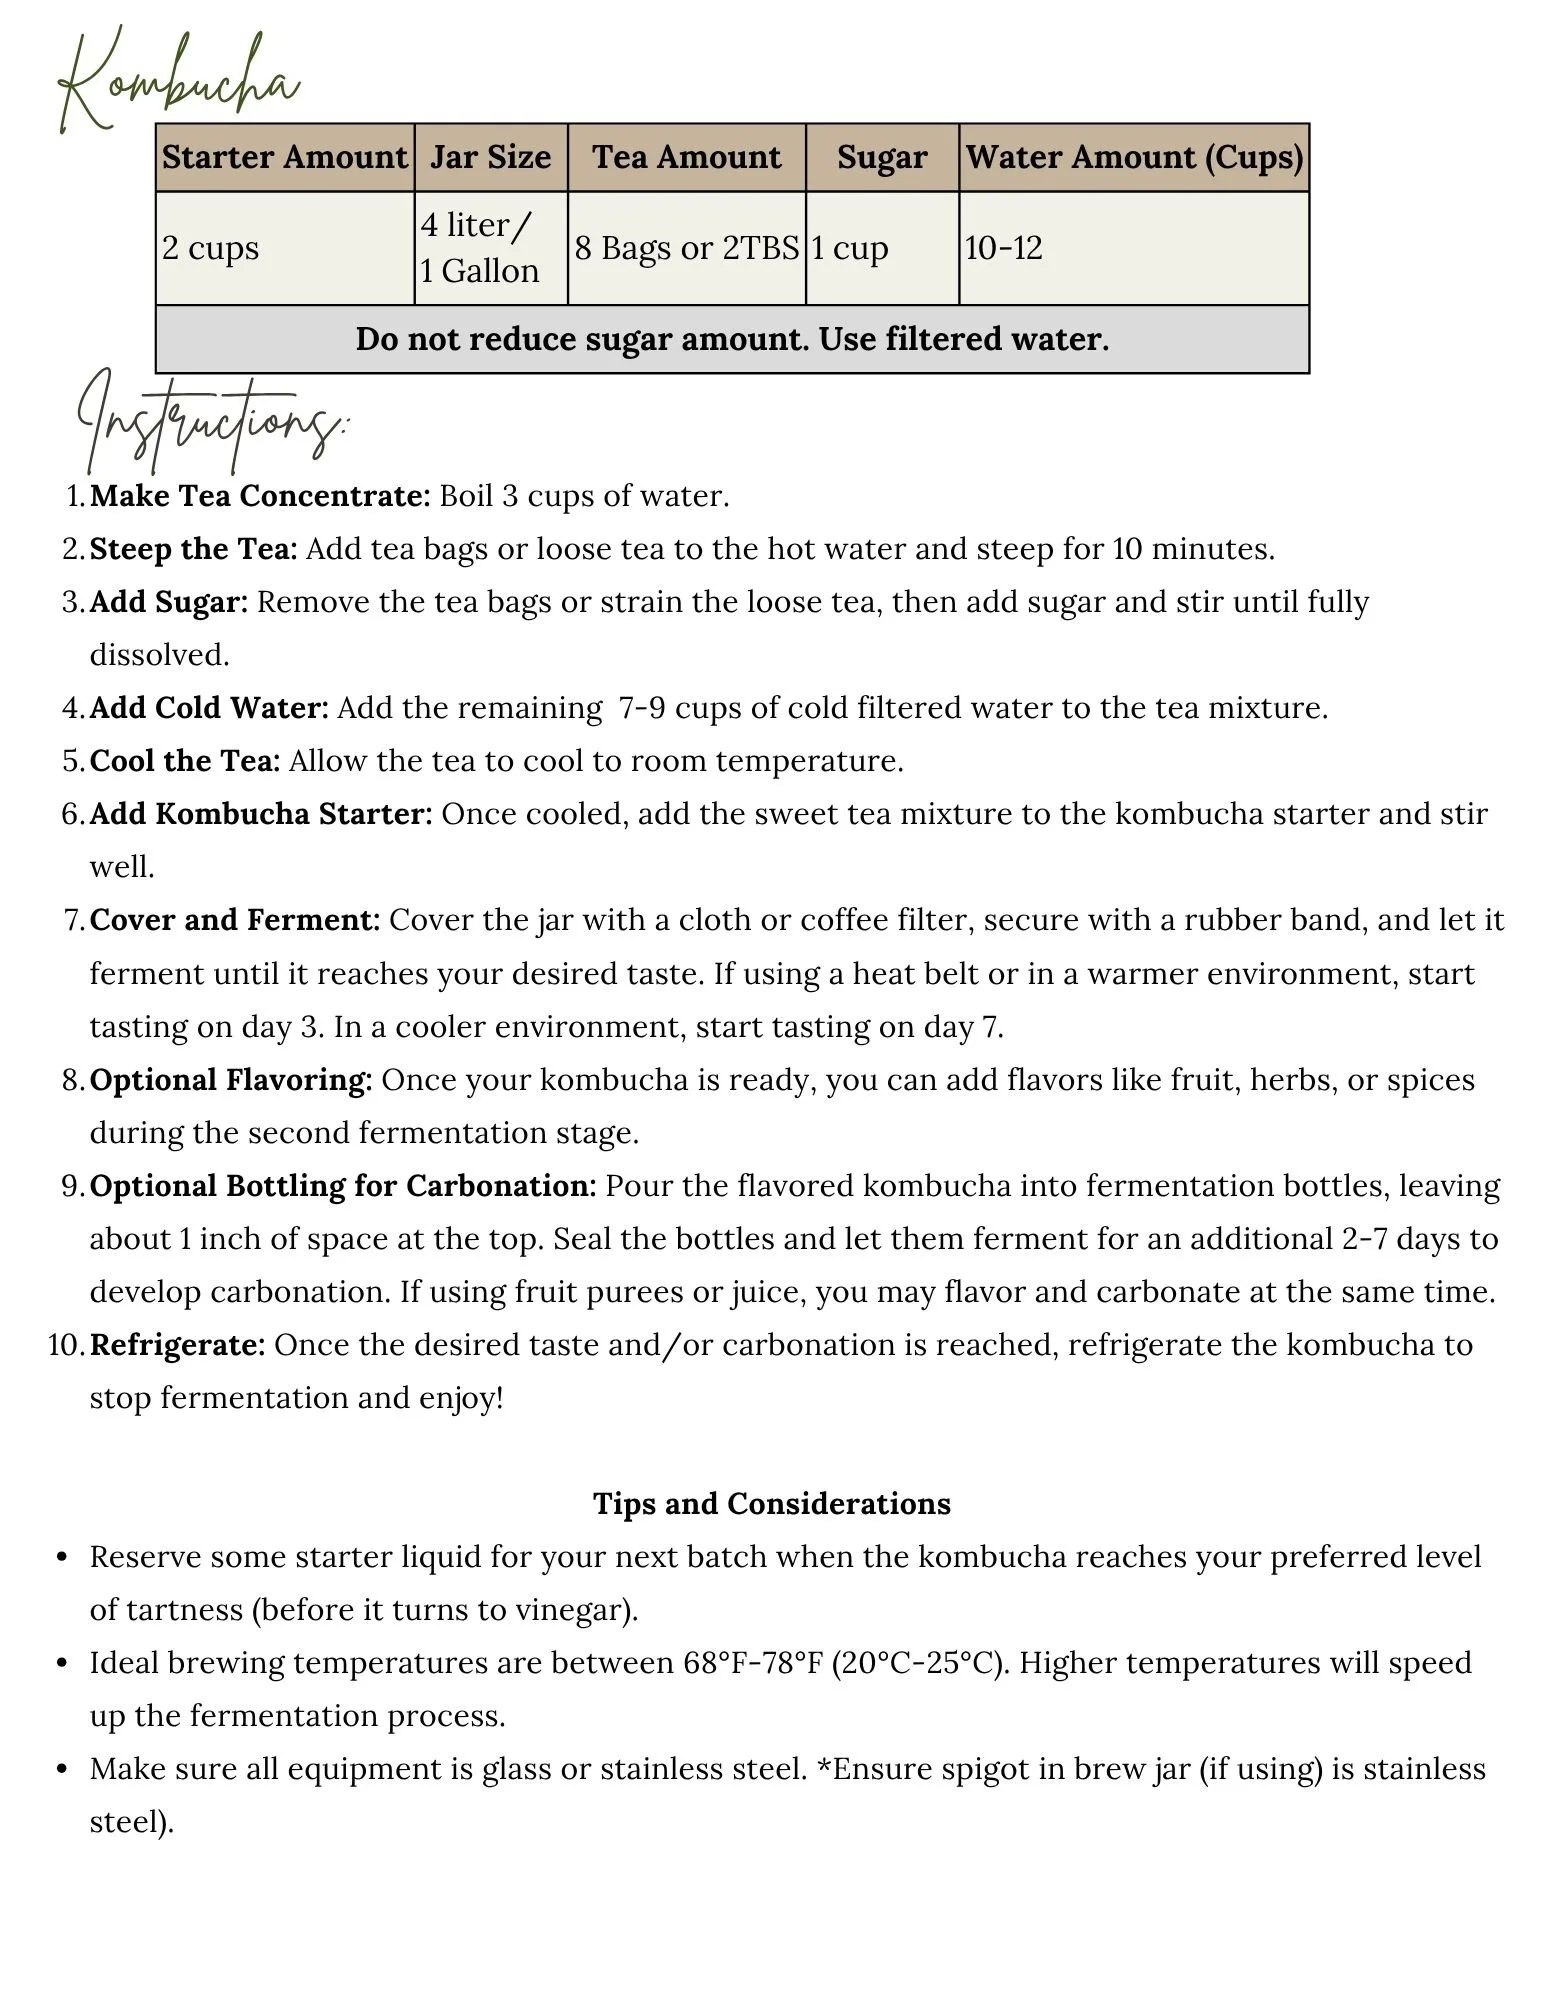
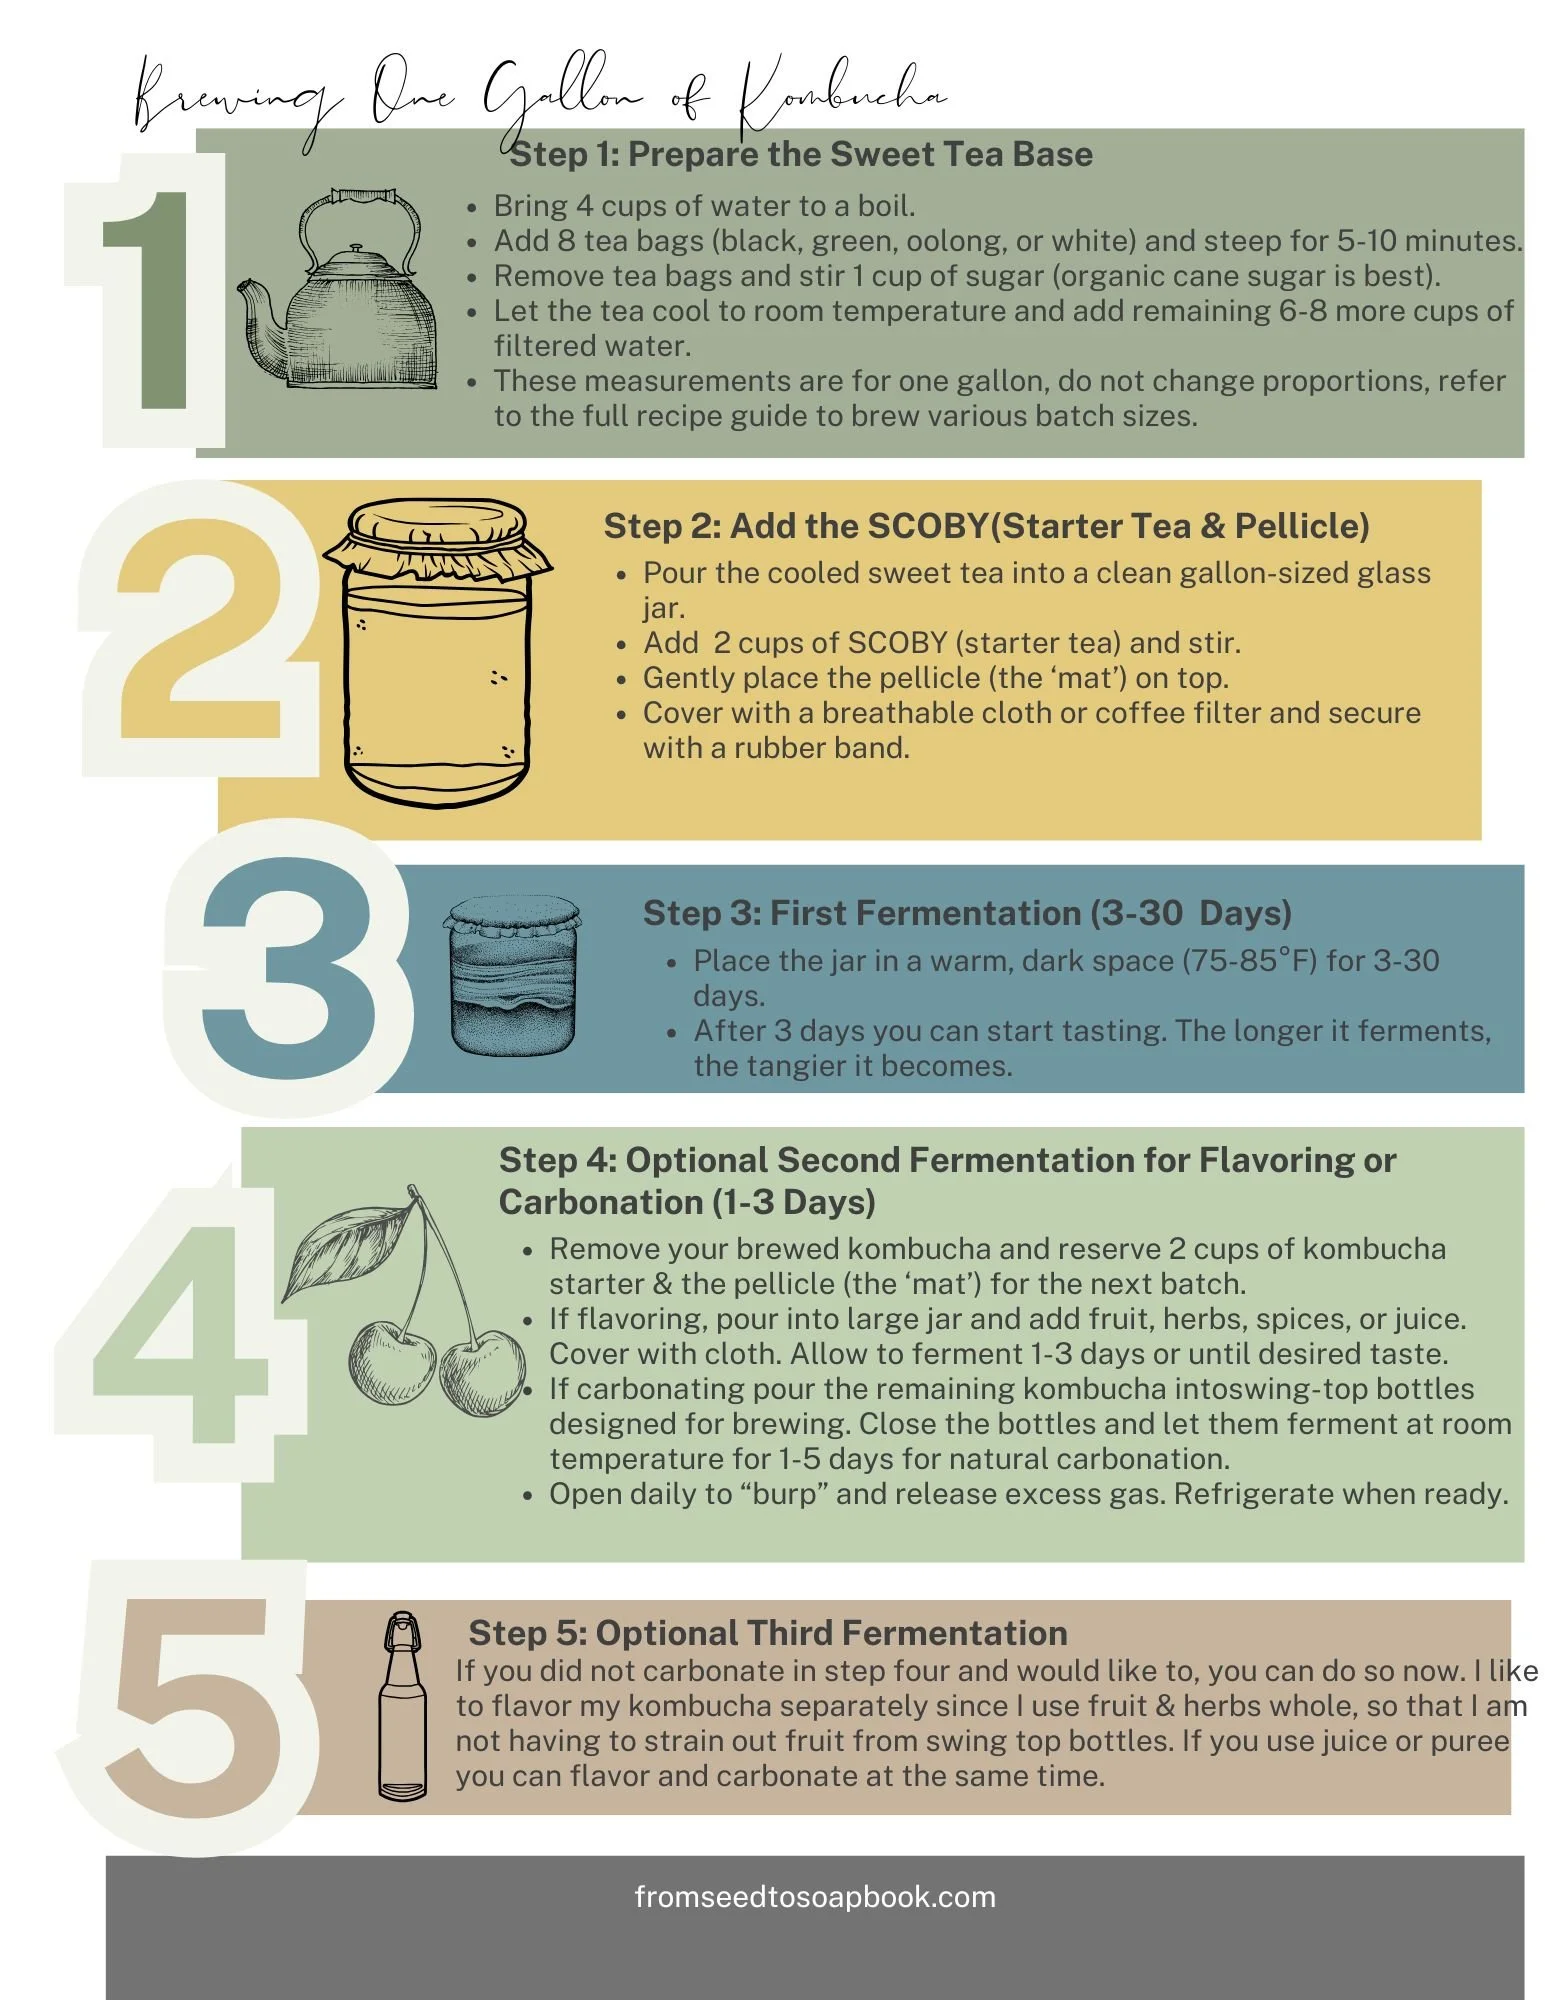
To keep your cycle going, simply pour off your finished kombucha into a new jar to enjoy immediately, flavor, or carbonate. Just make sure to leave 2 cups of starter tea and the pellicle right there in your original jar.
Now, all you have to do is brew up a fresh batch of sweet tea to replenish it, and your "yeasty beasties" will be ready to start the adventure all over again.
The final stretch of your kombucha journey! This is where you get to decide what you want to do to customize your kombucha. Think of it as the "Choose Your Own Adventure".
Choose Your Adventure
Adventure 1: The Simple Minimalist (Drink & Chill)
If you love the flavor exactly as it is and don't care much for bubbles or fruity flavor, this is your stop. Drink a little, then pour your brew into clean jars or bottles. Place them directly in the fridge. Cold temperatures act like a "pause button" for fermentation, locking in the taste.
Adventure 2: Infuse Flavors or Carbonate (Second Fermentation / 2f)
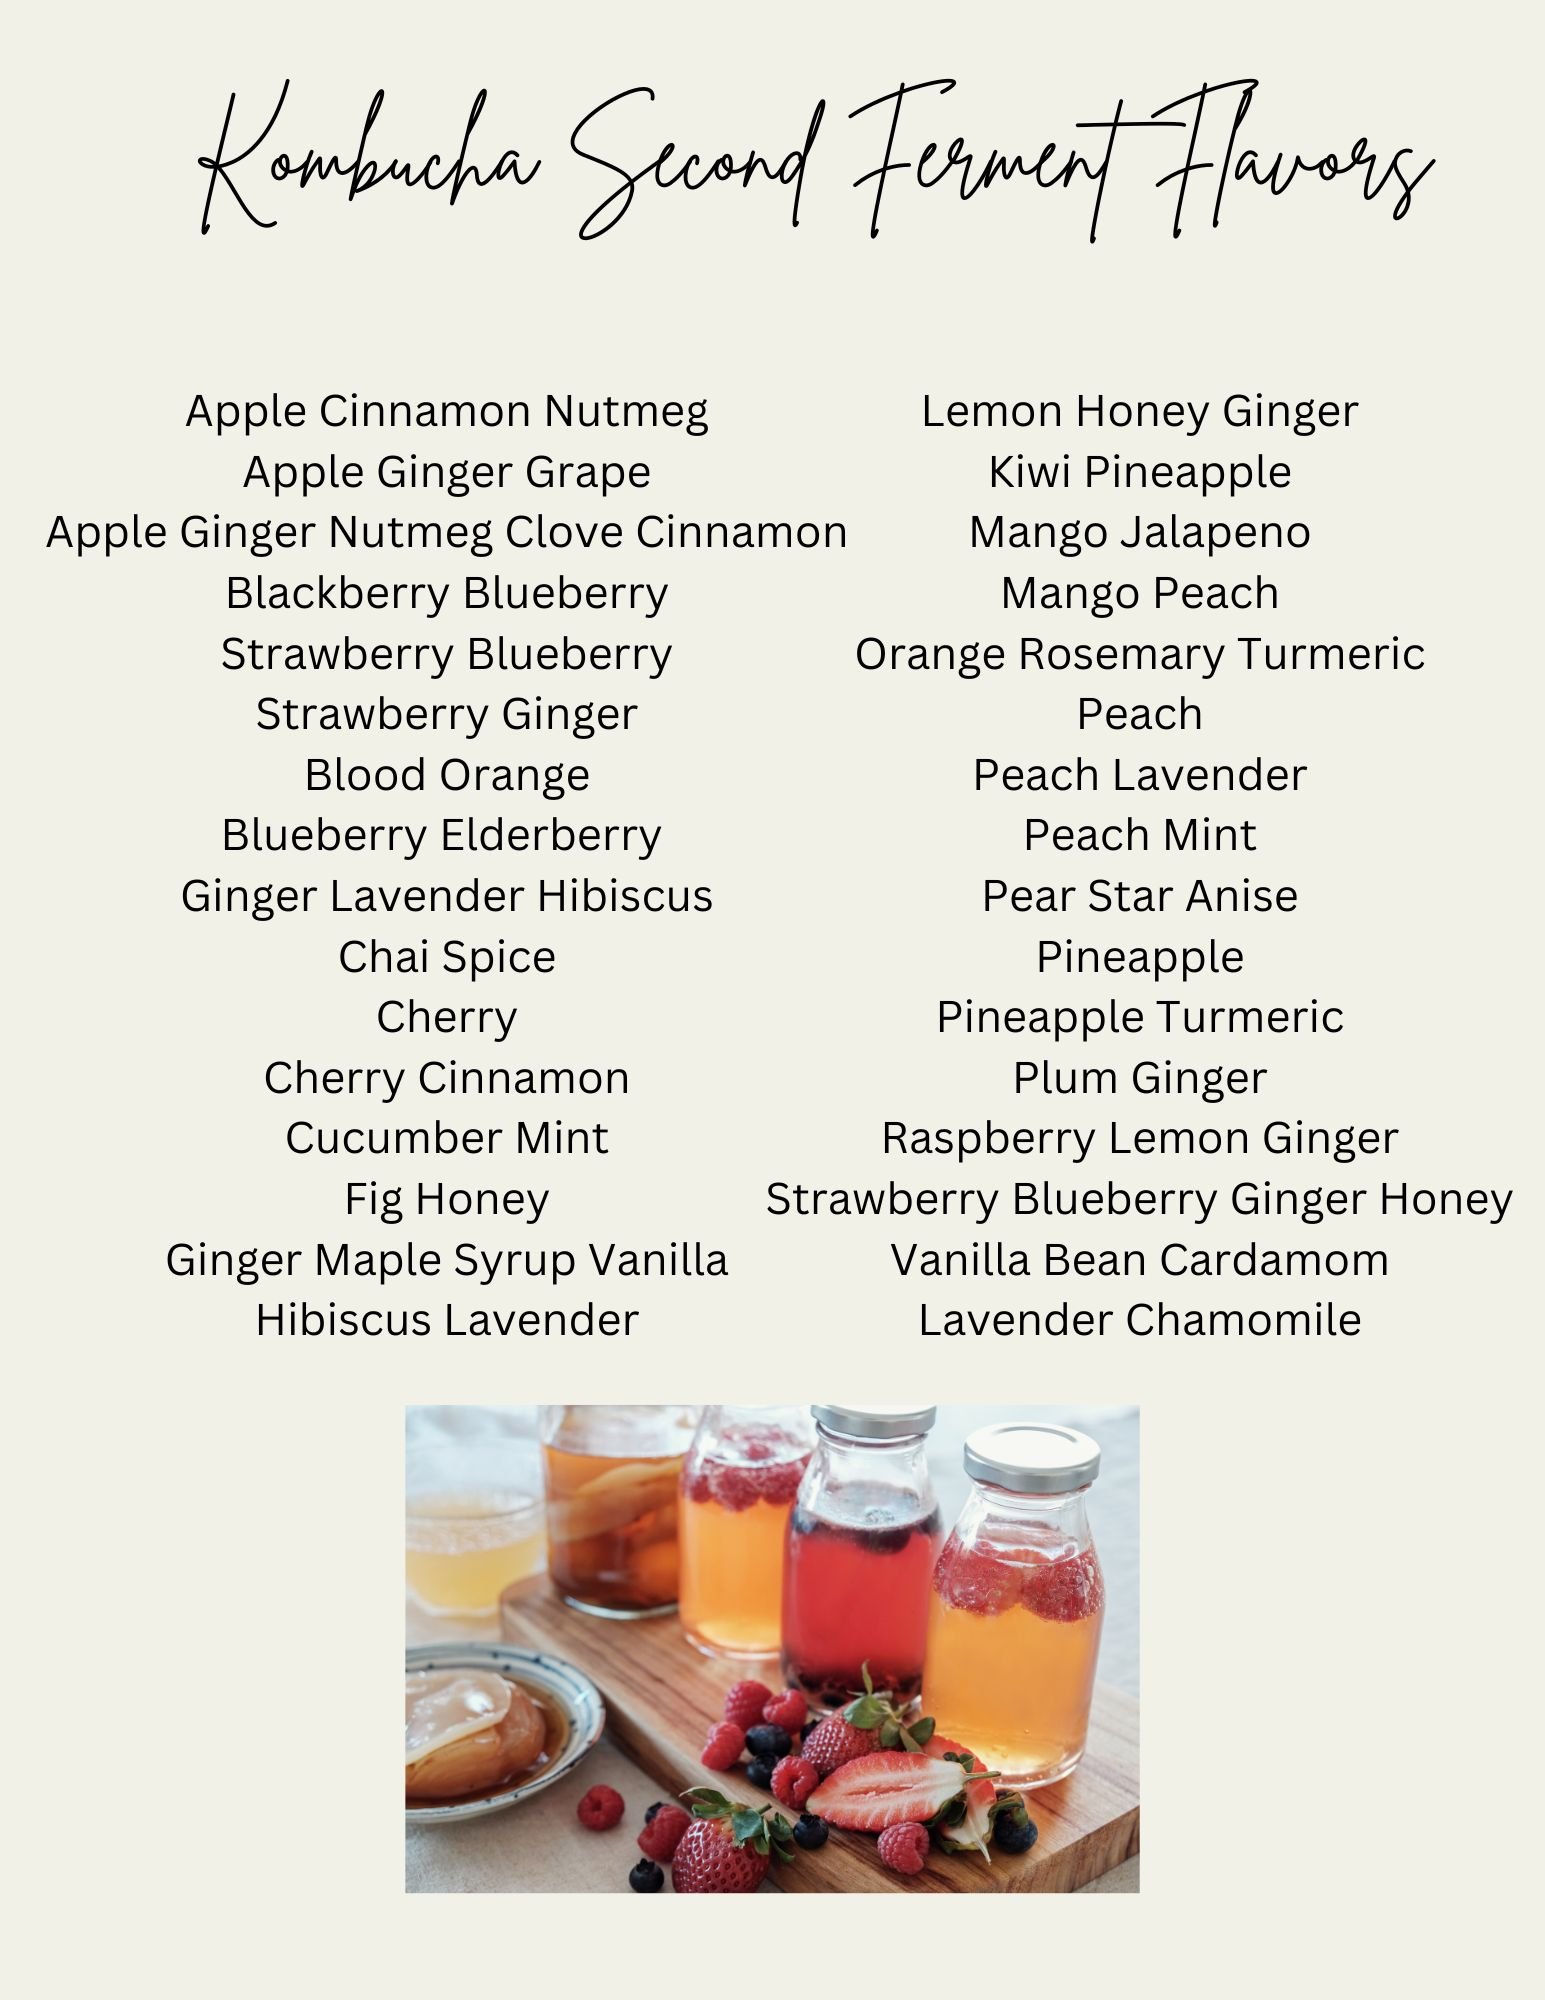
This is where you get creative with flavors like blueberry, ginger, or honey.
Herboligist/Fruitologist: Add your fruits/herbs to a half-gallon jar (like a Ball jar). Cover with a coffee filter and let it steep at room temp for 1–3 days.
Carbonation: If you want fizz without added flavors, skip the fruit and pour the plain brew into pressure-rated bottles for 2–5 days. Your 2F will be all about developing carbonation. Let bottles sit at room temperature for 1-5 days to develop soft bubbles. You can not use canning jars such as Ball jars for carbonation as they will explode! Keep your bottles between 75°F and 85°F. You may need a heat mat for this.
Tip: Fresh Puree vs. Fruit Chunks: Puree provides more surface area for the yeast to snack on, usually resulting in faster carbonation. If you use puree, you can infuse flavor and create carbonation in pressure-rated bottles at the same time. Since you don’t have to strain any fruit after infusing flavor, you can combine two steps in one.
Flavor suggestion: Try a handful of sliced blueberries, ½ inch of ginger, and 1 tsp of honey for a half-gallon batch. My kombucha guide shares dozens of flavoring options. I like the health benefits and taste of ginger, so I add it to almost every combination I come up with. Green tea kombucha, pineapple, honey, ginger is another all time favorite at our home.
Adventure 3: Carbonation After Flavoring (Third Fermentation / 3f)
The only time you will take time to process a third fermentation is if you used solid fruits and herbs during your 2F that need strained before using this stage to carbonate.
Strain: After straining your flavor infusions from the 2f, you will bottle the kombucha to create carbonation.
Bottle: Pour the flavored liquid into swing-top brewing bottles that are pressure-rated. You can not use canning jars such as Ball jars for carbonation as they will explode!
Carbonation: Seal the bottles and let them sit at room temperature for 1–5 days. The process of continued fermentation is slowly producing CO2 and creating natural carbonation. Keep your bottles between 75°F and 85°F. You may need a heat mat for this.
Chill: Once it reaches peak fizz, move to the fridge.
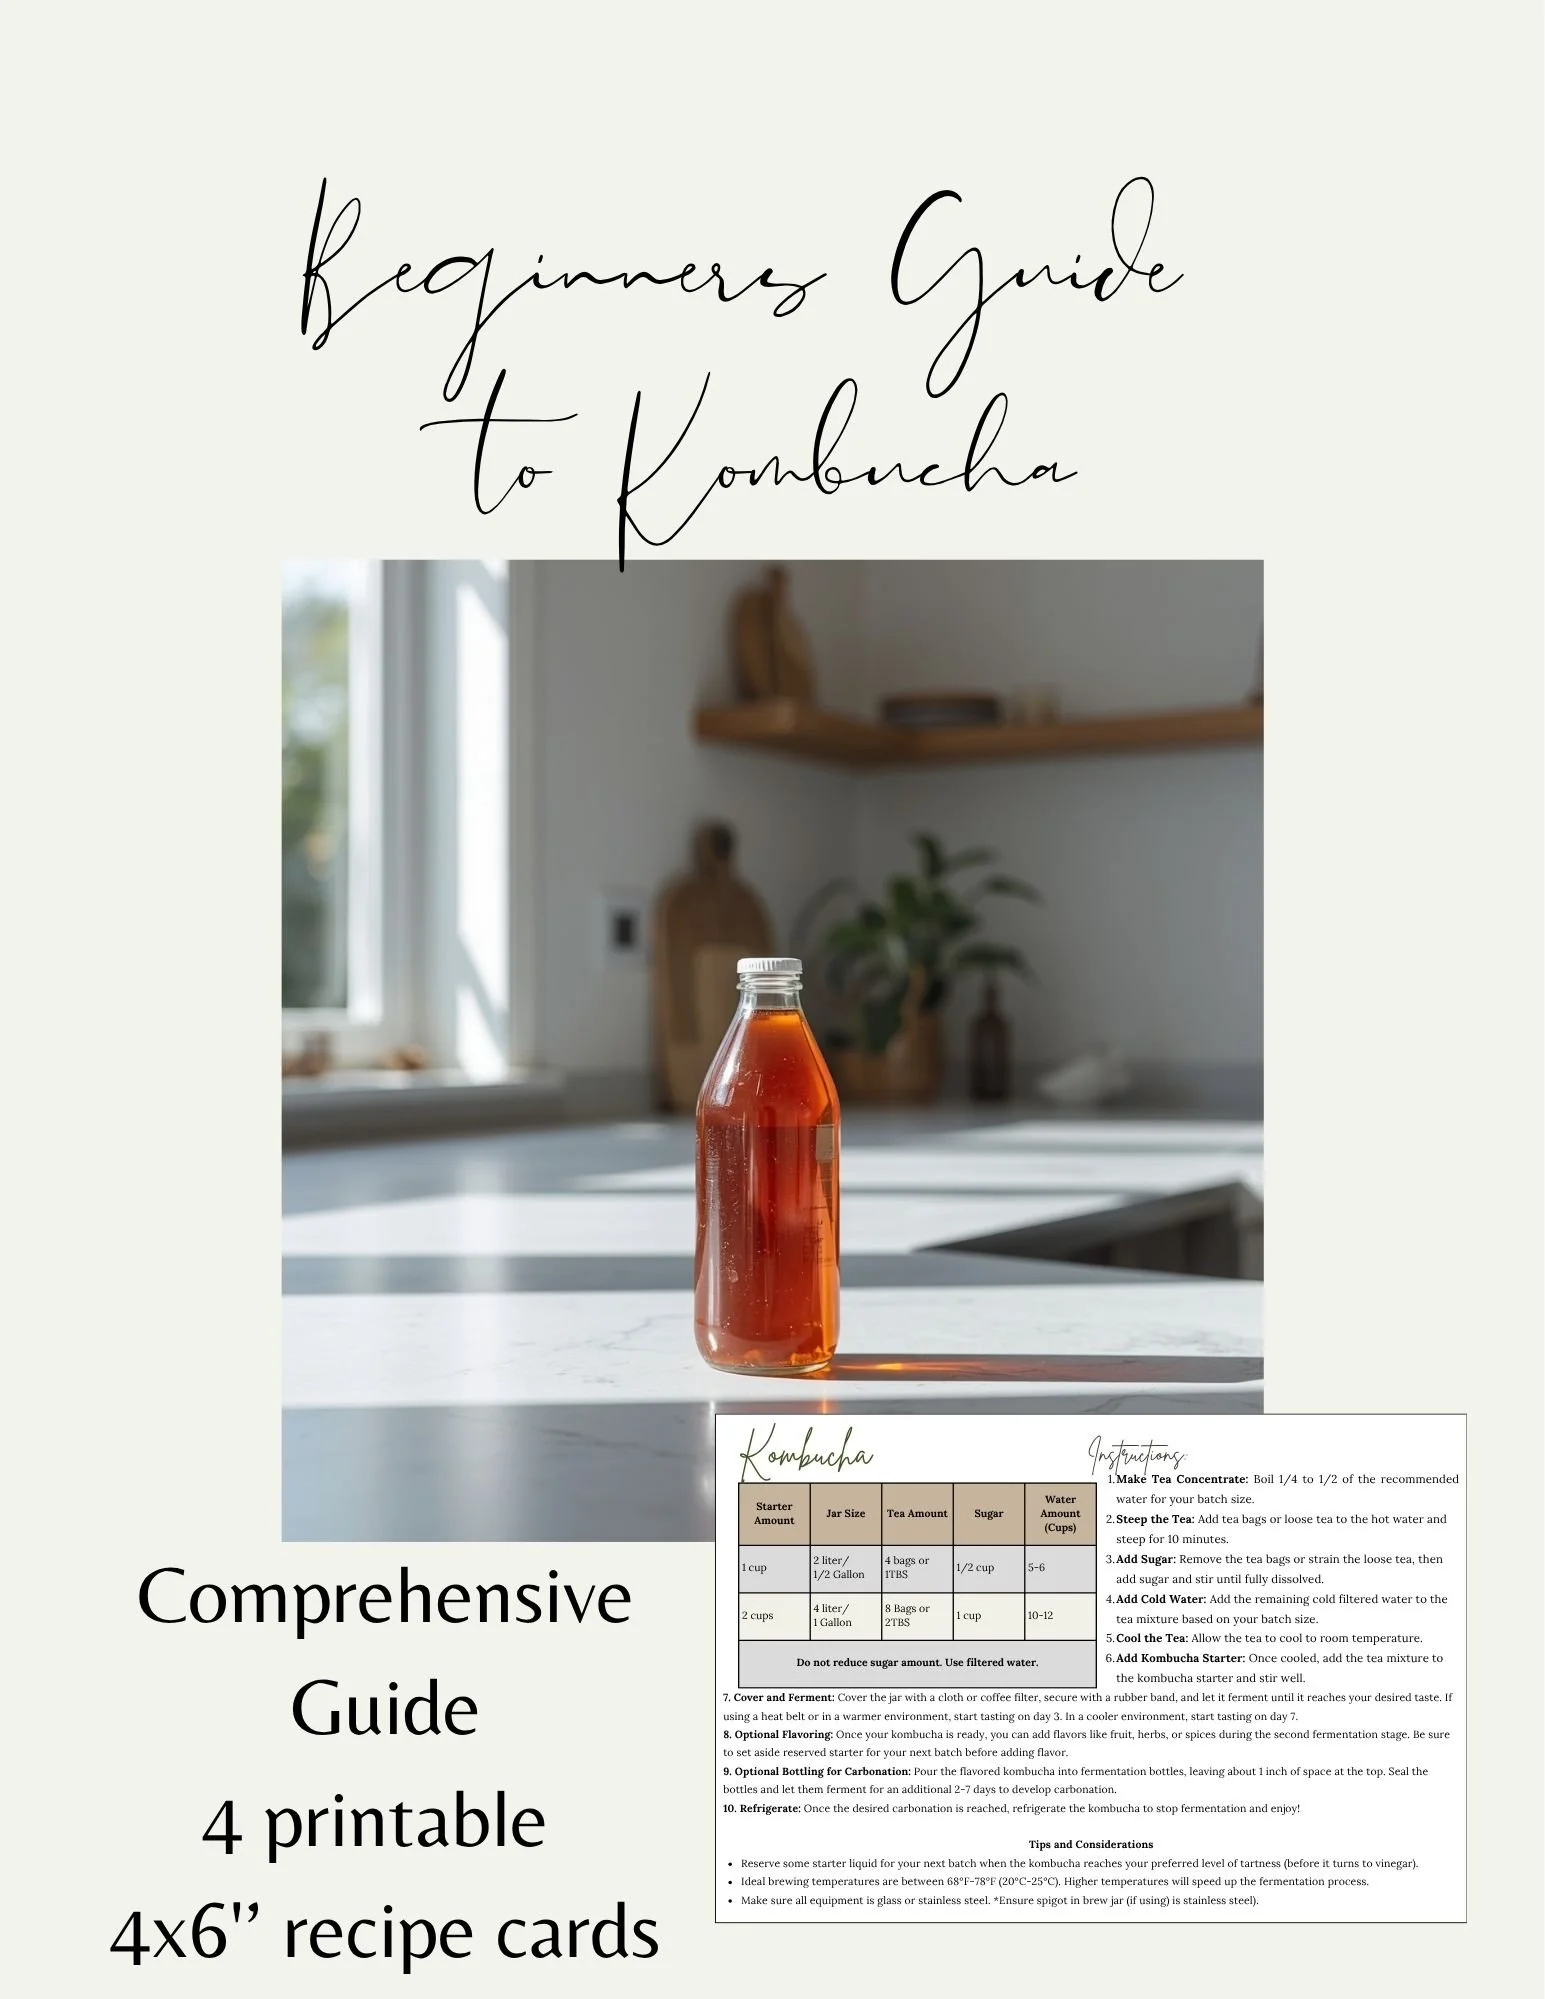
Want the full guide with recipe cards? Instant digital download. More doing, less scrolling.
Brewing Best Practices
Ideal Temperature: Aim for 68°F–78°F. Higher temps speed things up; lower temps slow them down.
Airflow & Light: Keep your brew out of direct sunlight. Do not place it in a cupboard; it needs good airflow to "breathe." Use a lightwave cloth and rubber band to cover your brew. No cheesecloth.
The "No-Bumping" Rule: Try not to move or disturb the brew. Disturbance can slow down the fermentation time.
Multiple Cultures: Brew in a separate area away from other cultures (like sourdough). This prevents cross-contamination from airborne yeast and ensures the integrity of each ferment which can affect the flavor of each.
Mold: Mold is rare, but if it develops, you must toss everything and sanitize the vessel. Otherwise, you only need to sanitize before your very first brew. Mold will look fuzzy.
Over-Fermentation: Does your brew taste like strong vinegar and you think you just ruined everything? It’s not that serious, and no - you have not ruined everything.
The Solution: This "vinegar" actually makes a very strong starter liquid. You can also use it in any recipe that calls for vinegar!
New Batch: Simply reserve a portion of the over-fermented kombucha and a piece of the pellicle (the SCOBY), and use them to jumpstart a fresh batch.
Don’t want to toss the rest? Over-fermented kombucha makes an excellent live-culture salad dressing or hair rinse!
The beauty of kombucha is its resilience. As long as there is no mold, your culture is likely just fine and waiting for a fresh dose of sweet tea to get back to work.
Supplies Shopping List
Must Haves: Brew jar, thermometer strips, kombucha starter, green or black tea, and sugar. My Kombucha Brewing Guide that explains each step in depth.
Highly Recommended: Heating belt.
Optional: Brewing jars for carbonation. For flavoring use quart or half gallon Ball jars. I prefer the half gallon size.
Steel strainers for straining fruit and herbs. Tea strainers if using loose leaf tea. Heating matfor carbonation.
Brew Jar Options:
Brew Jar (with and without spout)
2 Brew Jars without spouts / with thermometer strip
Lead-Free Brewing
If brewing in a thrifted vessel, care should be taken to ensure the vessel you use is lead-free. Some ceramic pots have been known to leach lead because the acids in the tea cause it to leak from the ceramic glaze. Stick to high-quality glass or certified lead-free vessels to keep your brew—and your health—safe. I found a $100 ceramic brew vessel for $15 while thrifting… I bough this lead testing kit to ensure it was safe.
I only recommend products I truly believe in. This post contains Amazon affiliate links, which means I may earn a small commission if you make a purchase through them (at no extra cost to you!), helping me keep this garden of information growing.