
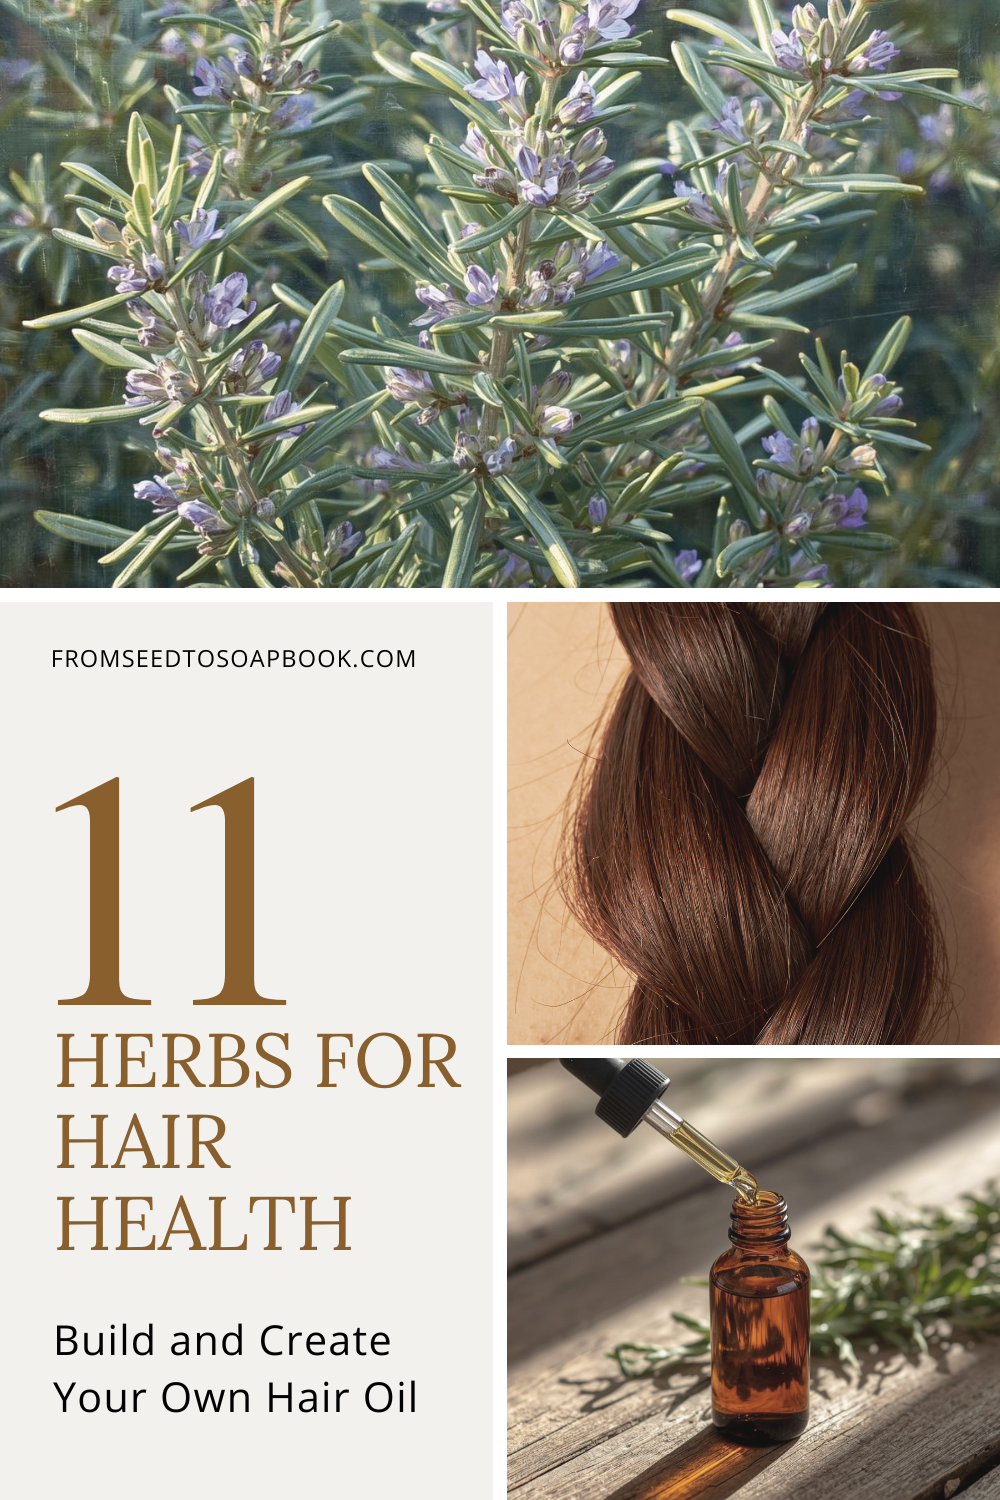
Choose Your Own Adventure: A Guide to Custom Herb-Infused Oils for Hair Health
It’s almost cringe-worthy to admit now, but I used to actually complain about my hair being 'too thick.' I remember viewing the maintenance as a total burden; fast forward to today, and I’d give anything to have that 'burden' back! If you are on the same mission as I am to avoid store-bought products and the synthetic ingredients they contain, let’s harvest the power of nature and grow some beautiful locks together.
You may doubt that herbs provide any measurable benefit to health or healing. You might even think they were only used in a time before scientists were 'smart' enough to create modern, petroleum-based pharmaceuticals. Or, perhaps you already recognize the healing nature of the plants around us.
The truth is, these herbs really work. In fact, numerous studies on these and many other botanicals prove they are often just as effective—if not more so—than our modern alternatives. It’s almost as if we, and the world around us, were intelligently designed. But that’s a story for another day. The point is: Yes, they work.
Want to dive into the data?
This Rosemary study reports that those using rosemary oil or minoxidil 2% had significant increased hair growth. Results were observed at the sixth month mark. Minoxidil is the active ingredient in hair growth formulas such as Rogaine.
The Peppermint Study. At 4 weeks the group using peppermint essential oil showed the most prominent hair growth effects; a significant increase in dermal thickness, follicle number, and follicle depth. An important note is that this study used peppermint essential oil diluted to a 3% usage rate in jojoba oil.
Rosemary is a scalp powerhouse. Research suggests that rosemary oil can be just as effective as minoxidil (the active ingredient in many hair-growth products) for encouraging regrowth. It works by boosting blood circulation to the scalp, ensuring your follicles get the nutrients they need to stay strong. If Rosemary is the builder, Peppermint is the awakener. Peppermint invigorates the scalp, unclogs stubborn follicles, and provides a cooling relief that fights dandruff and itching.
Don't have access to rosemary and peppermint? You can easily source them through reputable sellers—or, simply keep reading to discover a long list of other herbs that are powerful hair healers!
Making an Herbal Hair Oil: Choose Your Own Adventure
Think of this as a Choose Your Own Adventure for your scalp. Since everyone’s hair journey is different, you get to play herbalist and pick the base oil that matches your specific goals. Whether you’re chasing thickness, fighting frizz, or soothing a dry scalp, there is a perfect botanical match waiting for you.
Step 1: Choose Your Base (The Carrier Oil)
Which base oil does your hair need?
Jojoba Oil– Mimics the scalp's natural oils, making it excellent for moisturizing and balancing the scalp. It's also lightweight and non-greasy. When heating, do not exceed 120°F (49°C).
Argan Oil – Packed with vitamin E and fatty acids, it helps to repair damaged hair, add shine, and control frizz. When heating, do not exceed 120°F (49°C).
Castor Oil – Known for promoting hair growth, it helps with thickening hair and preventing hair loss. It’s thick and sticky, so it’s best to "adventure" with this one by mixing it 50/50 with a lighter oil. When heating, do not exceed 140°F (60°C).
Sweet Almond Oil – Rich in vitamins A, B, and E, it helps strengthen and soften hair while adding shine. It's light and easily absorbed. When heating, do not exceed 120°F (49°C).
Olive Oil – Moisturizes and nourishes dry or damaged hair, helping to reduce split ends and improve overall hair health. When heating, do not exceed 140°F (60°C).
Avocado Oil – High in monounsaturated fats, this oil is great for moisturizing and strengthening the hair, improving elasticity, and preventing breakage. When heating, do not exceed 140°F (60°C).
Hemp Seed Oil – Rich in omega fatty acids, it helps with moisturizing the scalp, promoting hair growth, and preventing dandruff. When heating, do not exceed 120°F (49°C).
Rosehip Oil – Contains vitamins A and C, which help to repair damaged hair and promote a healthy scalp. When heating, do not exceed 95°F (35°C).
Step 2: Pick Your Herb or Herbs
Now that you have your base oil, it is time to choose your botanicals. You can select one or blend a few together to target your specific hair goals or use what you have growing in your backyard.
Growth & Strength Powerhouses
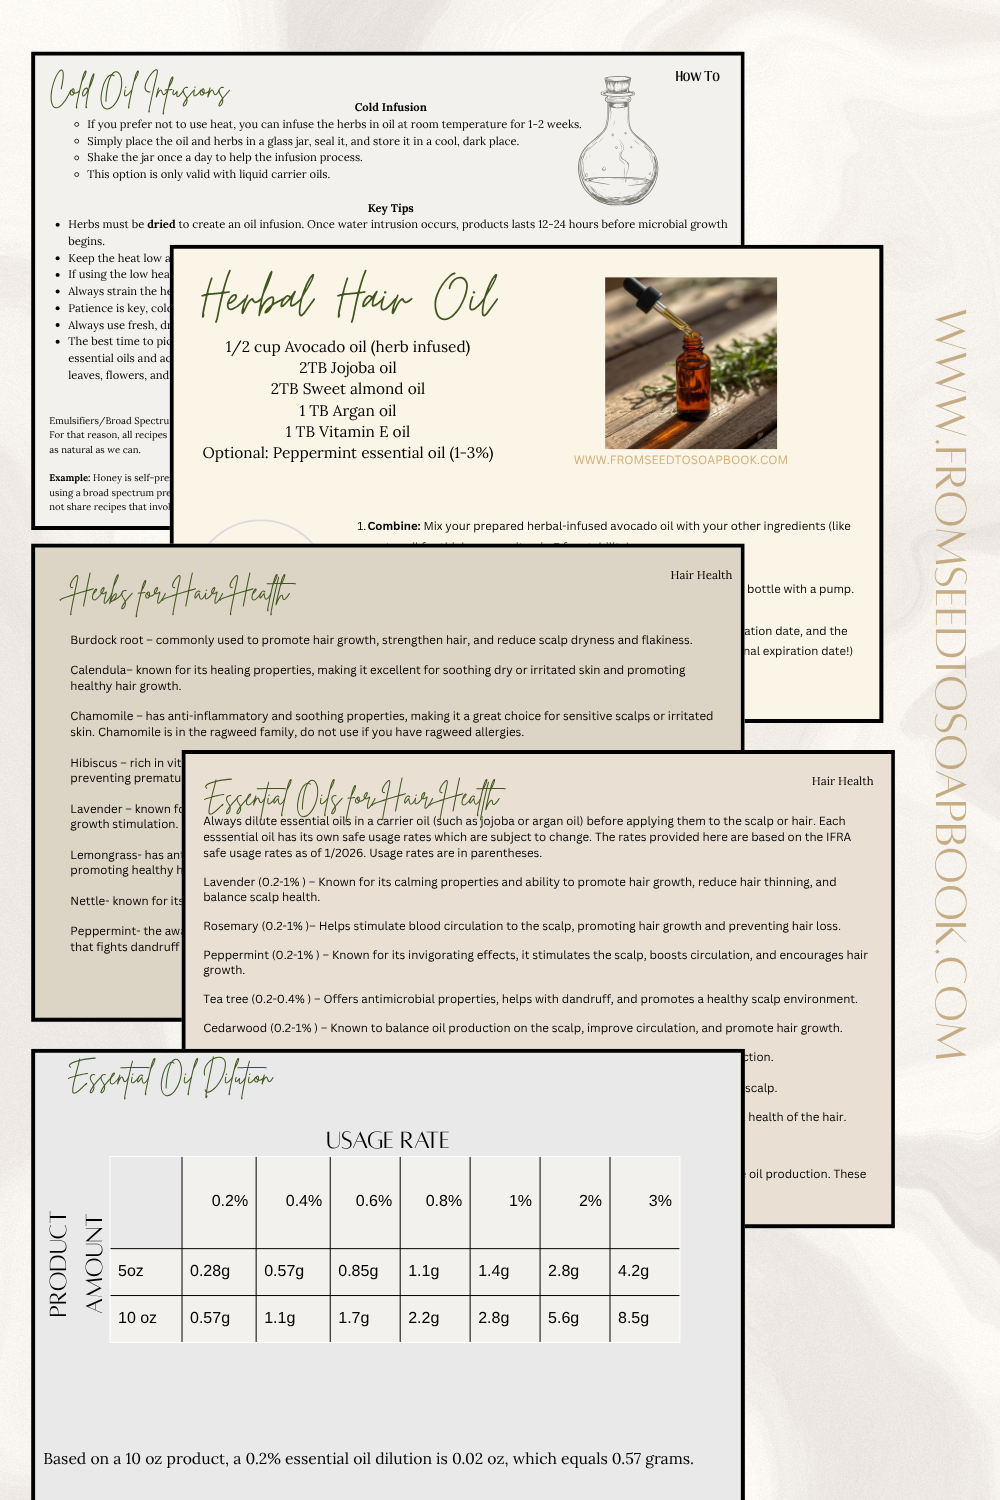
Rosemary: A natural way to promote hair growth, reduce hair loss, and improve scalp health. Studies suggest that rosemary oil can be as effective as minoxidil for hair regrowth by improving circulation and strengthening follicles.
Peppermint: Enhances circulation, unclogs follicles, and encourages hair growth. It may also be used on the skin to soothe itchy skin. Massage into the scalp after shampooing to promote hair growth and fight dandruff.
Nettle: Known for its ability to promote hair growth and reduce hair thinning, while also soothing the scalp.
Burdock root: Commonly used to promote hair growth, strengthen hair, and reduce scalp dryness and flakiness.
Thyme: Known for stimulating blood circulation to the scalp, thyme can encourage healthy hair growth and fight scalp infections.
Sage: Like rosemary, sage has a history of promoting hair health, particularly in strengthening hair and combating dandruff.
Scalp Soothers
Calendula: Known for its healing properties, making it excellent for soothing dry or irritated skin and promoting healthy hair growth.
Chamomile: Has anti-inflammatory and soothing properties, making it a great choice for sensitive scalps or irritated skin. Note: Chamomile is in the ragweed family; do not use if you have ragweed allergies.
Lavender: Known for its calming and soothing properties, lavender can help with scalp irritation, dandruff, and hair growth stimulation.
Hibiscus: Rich in vitamins and antioxidants, hibiscus helps nourish hair follicles, promoting healthy hair growth and preventing premature graying.
Balancing & Cleansing Botanicals
Lemongrass: Has antibacterial properties and can help balance oil production on the scalp, reducing dandruff and promoting healthy hair.
Step 3: The Infusion Process
Once you’ve combined your chosen oil and herbs, use one of these gentle heat methods to marry them together. Be sure to keep the heat low to keep the nutrients alive. When infusing, you must ensure your herbs are dry before infusing them in oil. To keep your hair care 100% natural and safe without needing to add broad spectrum preservatives, you should always ensure your herbs are completely dried before they touch the oil by hanging them to dry for a few days or using a dehydrator on the lowest setting. You must also avoid adding ingredients like fresh aloe or honey to your oil infusions, as these contain water and will cause your oil to spoil.
By using only dry ingredients and skipping these "wet" additives, you ensure your infused oil stays shelf-stable and safe.
Herb to Oil Ratios - The Folk Method
Instead of using a scale to measure, the folk method allows you to fill your jar based on 'the look of 1/3, or 1/2.
For a 1:3 Ratio: Fill your clean, dry jar about 1/3 full with your dried herb blend. This is a great, balanced strength for regular use.
For a 1:2 Ratio: Fill your jar 1/2 full with your dried herb blend. This creates a much more concentrated, "extra-strength" infusion.
Fill your clean, dry jar with your dried herb blend at the ratio you prefer.
Pour your carrier oil over the herbs until the jar is nearly full. Leave headspace, ensure there is at least 1 inch of oil covering the herbs and about an inch of space left in the jar.
Some herbs, like Calendula or Nettle, are very light and fluffy, while things like Burdock Root are heavy. If your herbs are very "fluffy," you can gently press them down into the jar before pouring the oil.
Method 1: The Double Boiler Method
Place your dry herbs and oil in a glass bowl or the top of a double boiler.
Place the oil and herbs in a double boiler, keeping the heat low (around 95°F to 120°F or 35°C to 49°C)
Warm for 30 to 45 minutes, stirring occasionally. Don't let it boil!
Once your infusion is complete, strain the mixture through a fine-mesh sieve or cheesecloth into a clean, dry glass bottle.
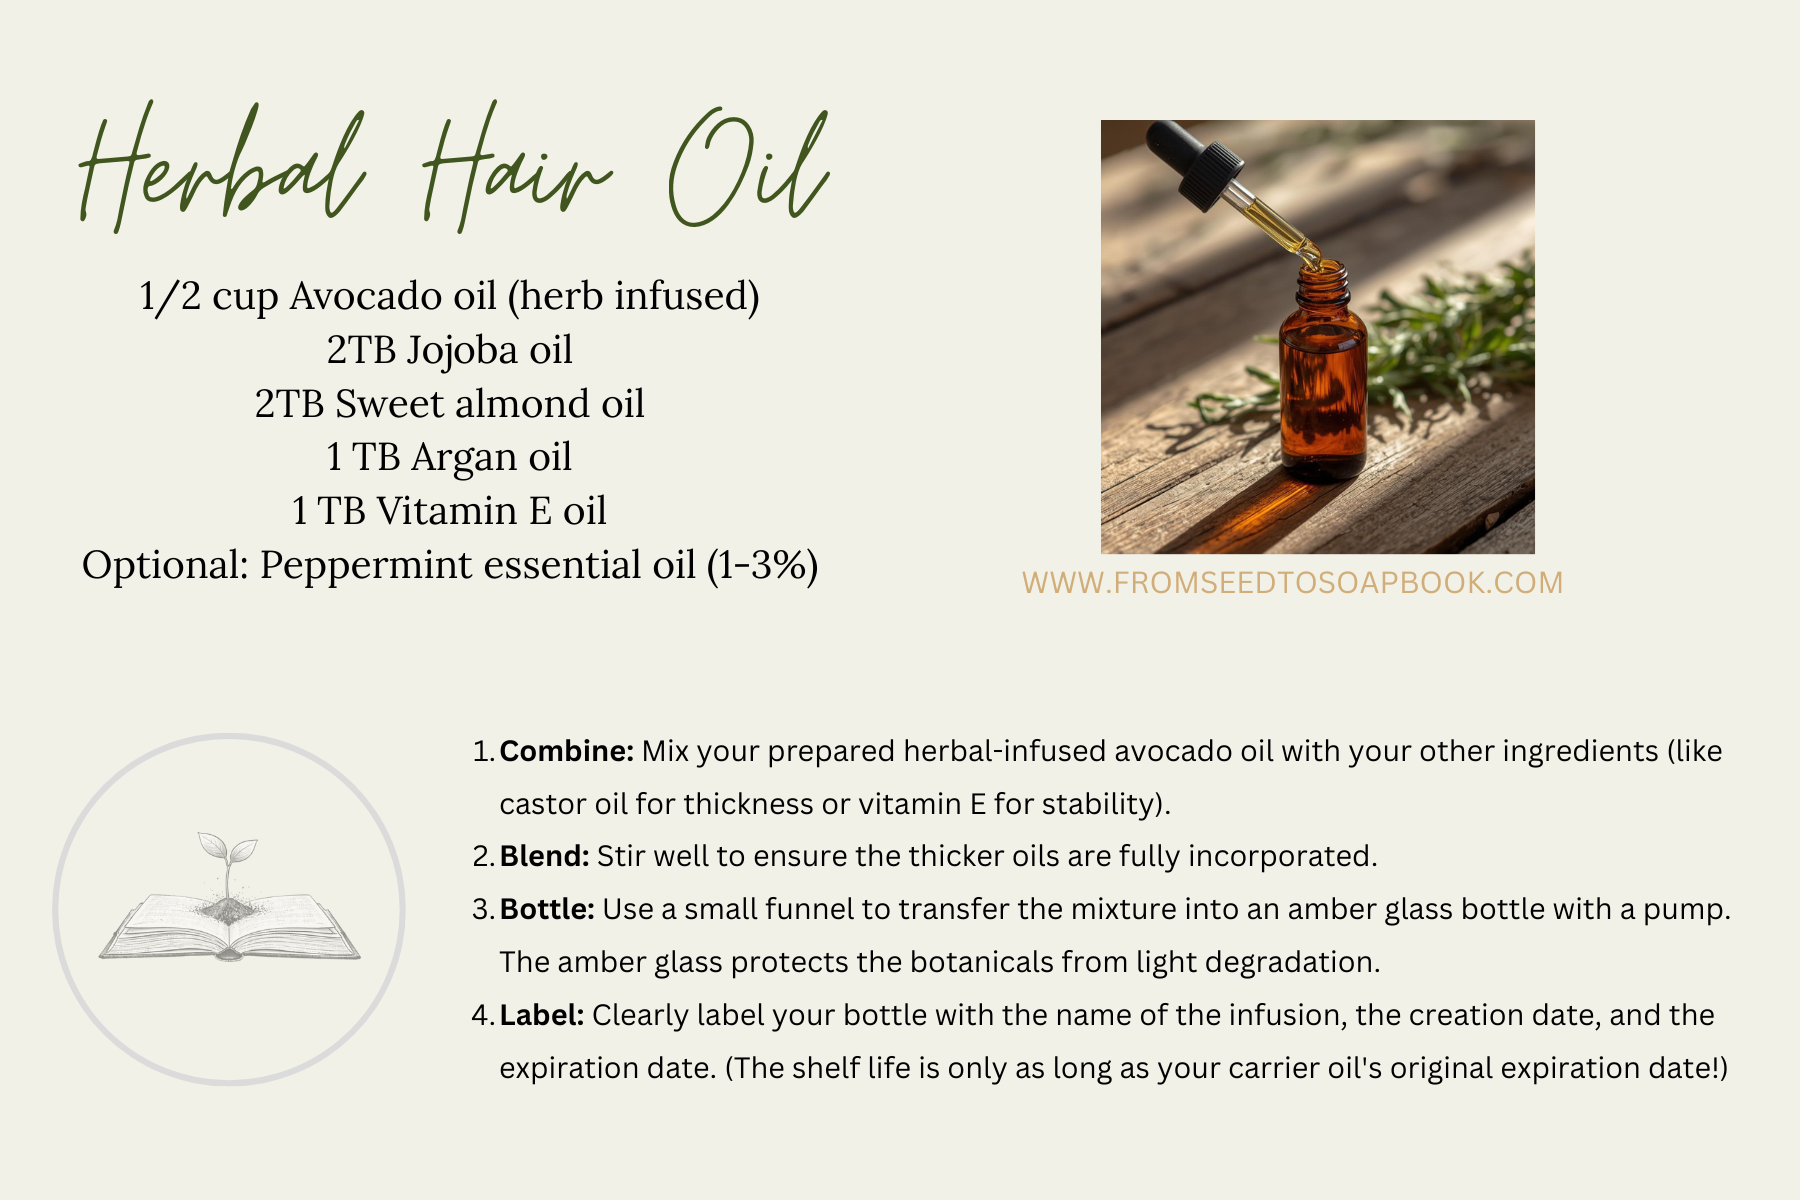
Your custom Choose Your Own Adventure herbal oil is now ready to use immediately or use the recipe below to create a well rounded hair oil. Use the excess in other body care products like tallow balms.
Method 2: The Crockpot Method
This provides a very thorough infusion with minimal effort. I actually prefer this method because my oils and herbs are in a jar with a lid and allows me to walk away without having to worry about steam getting into my infusion.
Place your dry herbs and oil in a glass jar and seal it with a lid.
Place a trivet on the bottom of the crockpot to ensure the jar doesn’t come in contact with the direct heat of the bottom.
Set your crockpot to "Low" and fill it with enough water to come about halfway up the jar. Leave the lid off the crockpot to keep temperatures low.
Let it infuse for 2 to 4 hours. Check every 30 minutes to make sure the water hasn't evaporated and the heat remains gentle. Shake the jar each time you check to distribute the herbs and heat evenly.
Once your infusion is complete, strain the mixture through a fine-mesh sieve or cheesecloth into a clean, dry glass bottle.
Your custom "Choose Your Own Adventure" herbal oil is now ready to use immediately or use the recipe below to create a well rounded hair oil. Use the excess in other body care products like tallow balms.
My perfected tallow balm recipes are here.
How to Use
For the Scalp: Massage the oil into your roots and let it sit for 30-60 minutes before washing. This gives the botanical compounds enough time to penetrate the follicles.
For the Ends: Apply a tiny amount to your ends whenever they feel brittle or dry to seal in moisture and prevent split ends.
Preserving Your Hard Work: Storage & Shelf Life
Since we are skipping the synthetic preservatives, how you store your oil is the key to keeping it fresh and potent.
The Shelf Life: Generally, your infused hair oil will stay fresh for 6 to 12 months.
Clearly Label the Best By Date: Your infusion is only as stable as the carrier oil you started with. If your Sweet Almond oil expires in 6 months, your hair oil will too! I always write my creation date.
Label Infusions: I always write the name & strength of the infusion (1/2 cup rosemary in 2 cups olive oil)—I promise, you will not remember exactly what is in that jar six months from now!
Storage Tips:
Cool & Dark: Sunlight and heat are the enemies of natural oils. Store your bottle in a cool cabinet rather than on a sunny windowsill.
Keep it Dry: When using your oil in the bathroom, be careful not to let shower steam or water droplets get inside the bottle. Remember: Water is where the mold begins.
The Sniff Test: Nature has its own alarm system. If your oil ever starts to smell "off," sour, or like old crayons, it has likely gone rancid and should be tossed.
Want this entire blog post, plus a few extras in printable format? Check out my 4×6’’ recipe cards!
I only recommend products I truly believe in. This post contains Amazon affiliate links, which means I may earn a small commission if you make a purchase through them (at no extra cost to you!), helping me keep this garden of information growing.